Laser Creation into Class Course | Case 2:DIYambient lighting design project

1
2
3
4
5

Drawing Description

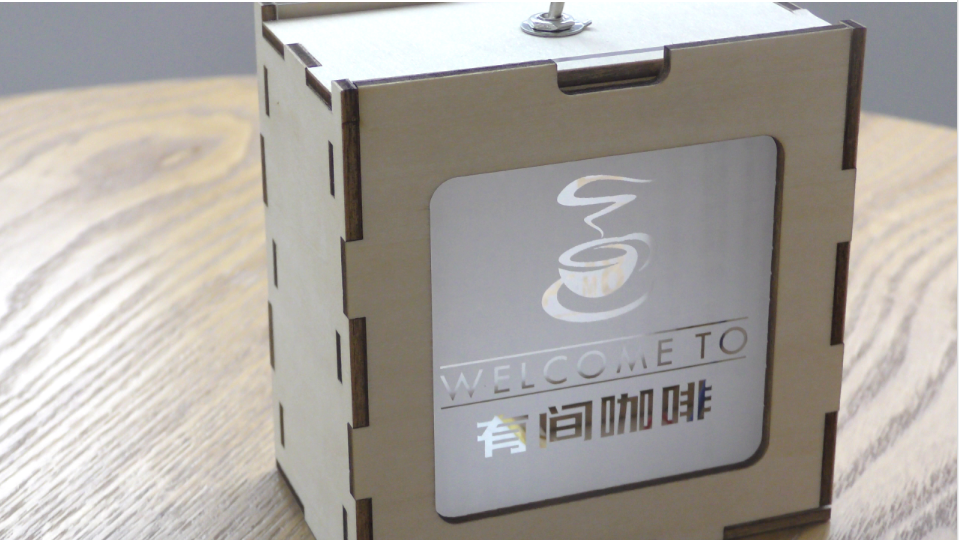
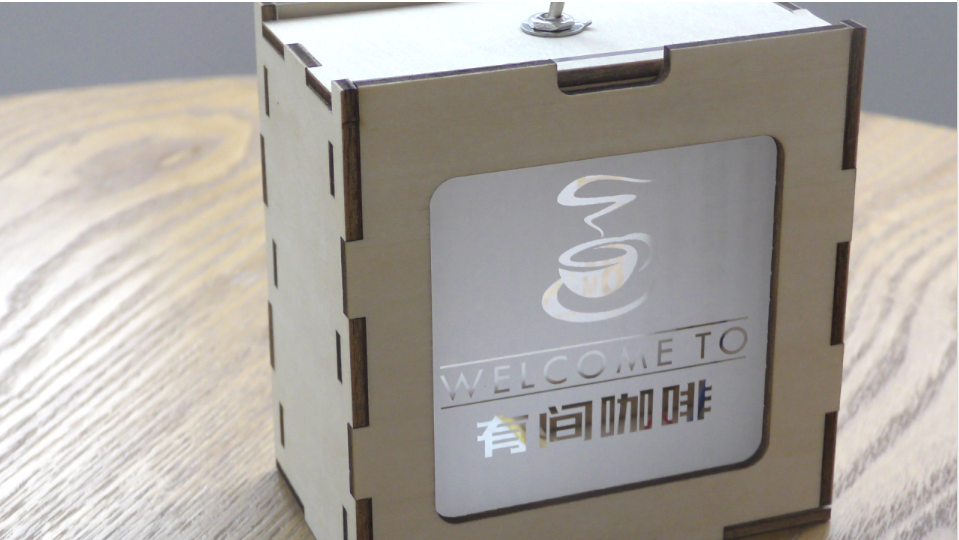
Atmosphere light, also known asLEDAtmosphere light, yesLEDA perfect choice for theme parks, hotels, homes, exhibitions, commercial and artistic lighting, creating an atmosphere of demand for people's lives. People can set their favorite patterns and styles according to their own lighting needs, and use different ambient lights based on their own requirements and scene conditions.


If you want to use different ambient lights in various scenes of life, you can try designing and making them yourself. In this issue, Laser Expert brings works to everyone“DIYAtmosphere lights!


diynight light.png

drawing documents

Small Night Light Frame
Drawing Cover - Small Night Light Frame
Basic Parameters
0:10:33

Square frame design

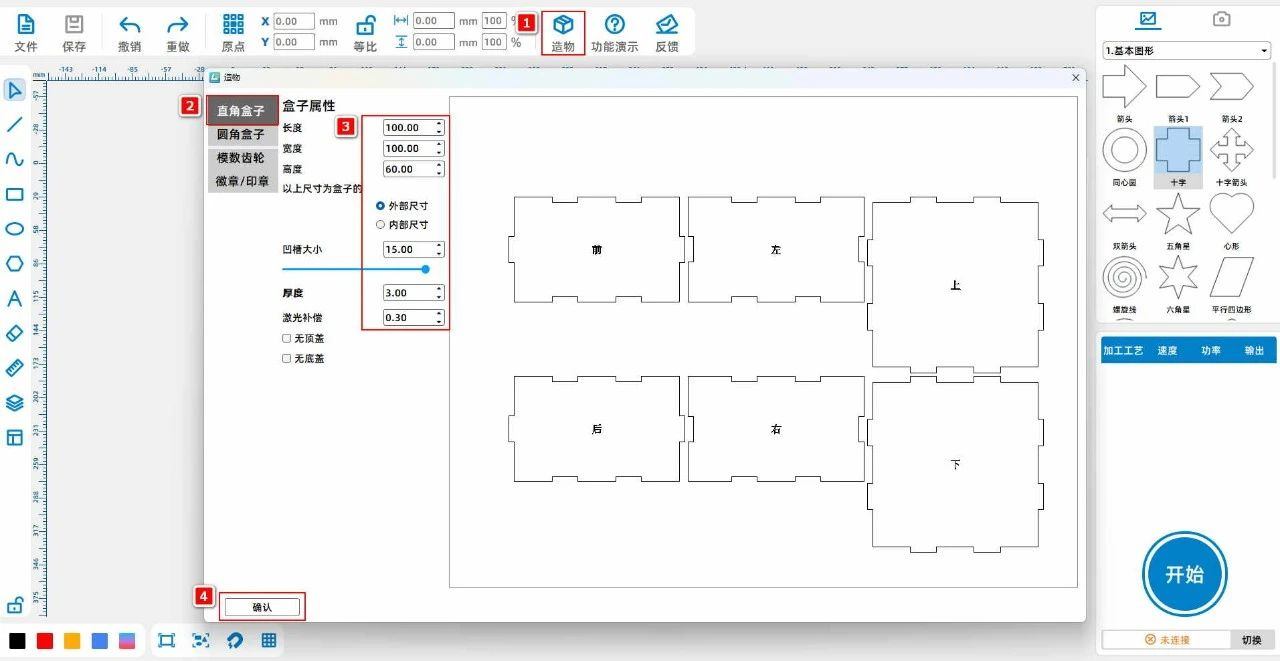
(1) Click the left mouse button on the top toolbar and select "Create". Choose "Right Angle Box" and set the length, width, and height to“100、100、60”The groove size is“15”As shown in the following figure:
3391b06b9c3edc8cd5e841bb0733ade2.jpg

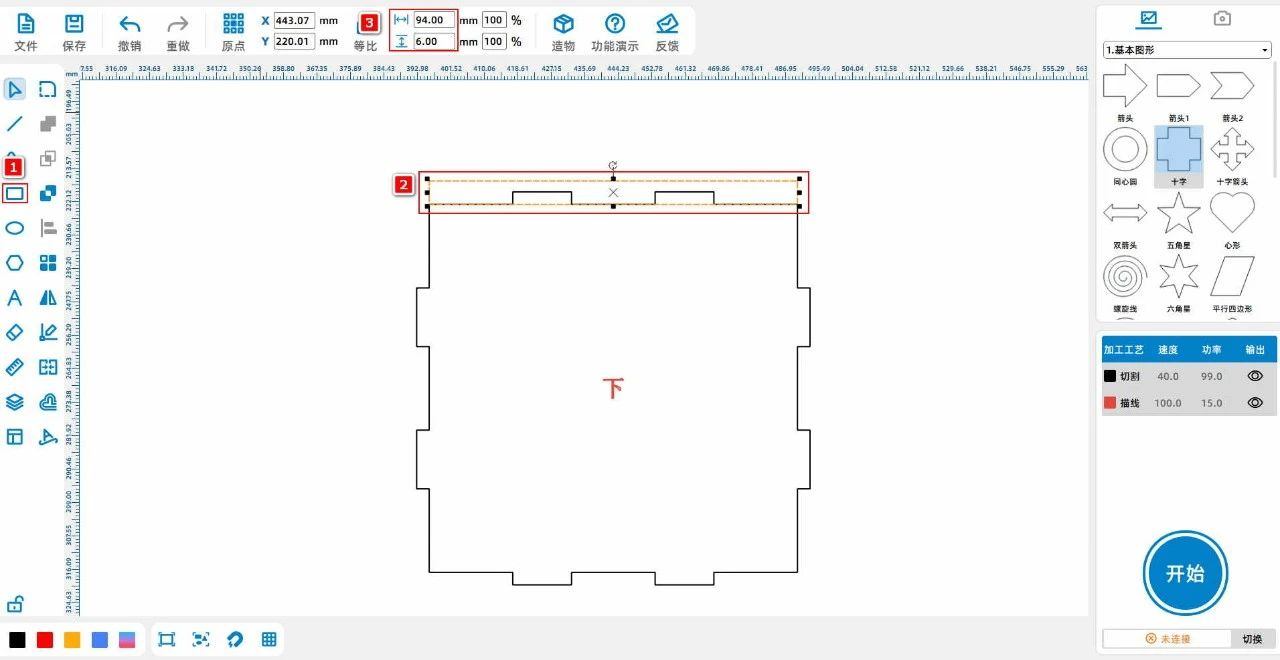
(2) Left click on the left toolbar of the mouse and select 'Rectangle'. Set the width and height to“94、6”Place it above the lower cover, as shown in the following figure:
ccf0576826a59061c3ab5ba2d698fc21.jpg

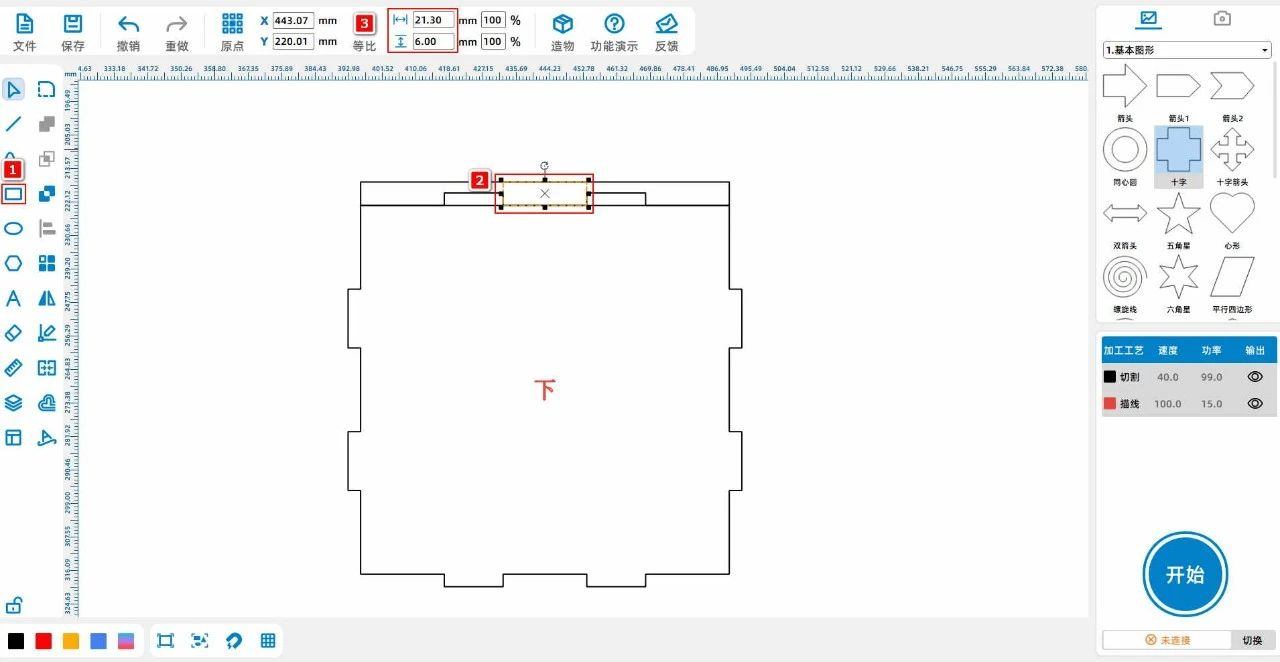
(3) Left click on the left toolbar of the mouse and select 'Rectangle'. Set the width and height to“21.3、5”Place it in the middle of the groove above the lower cover, as shown in the following figure:
a2367a49a50a08379c855063d8826c00.jpg

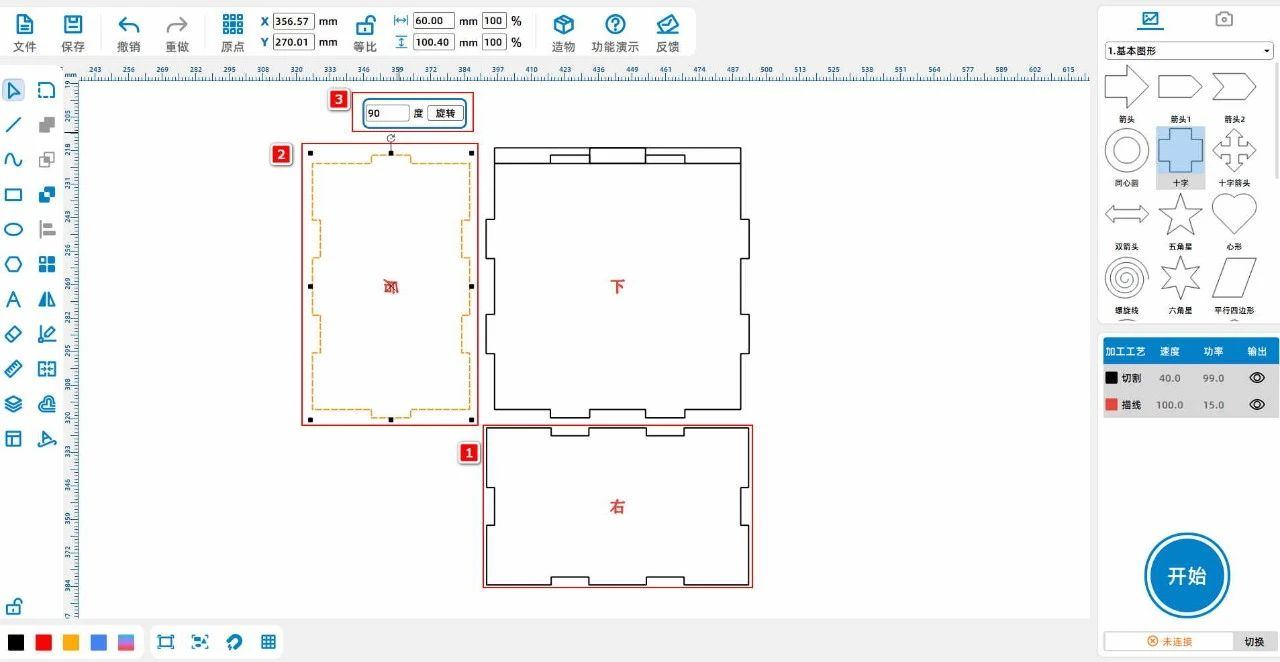
(4) Select the back cover with the left mouse button and rotate it“90° "and move to the left side of the lower cover; Select the right cover with the left mouse button and move it to the bottom of the lower cover, as shown in the following figure:
4c862c21c3168fe79676c29096e67fa9.jpg

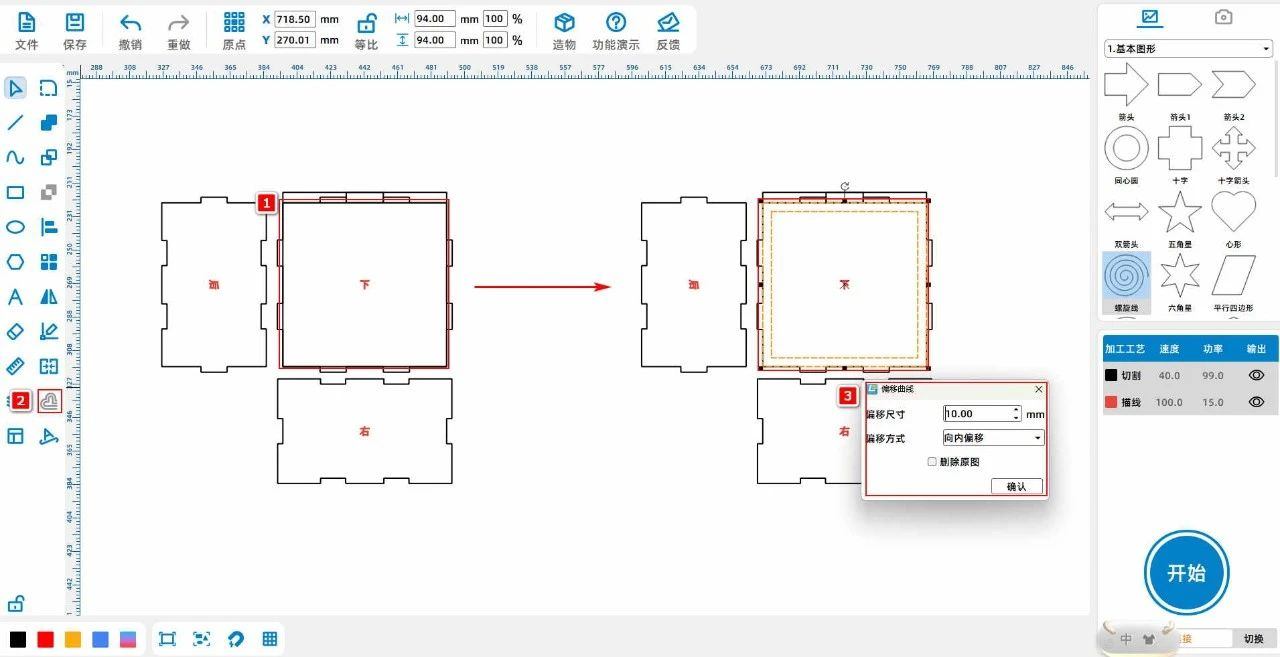
(5) Left click on the left toolbar of the mouse and select 'Rectangle'. Set the width and height to“94、94”Place it in the middle of the lower cover; Select the rectangle and click on the 'Deviation' button on the left toolbar

Shift Curve, set the offset size to“10Inward offset ", as shown in the following figure:
7ac2b3ac2ac4c467a4b7b1677fb91880.jpg

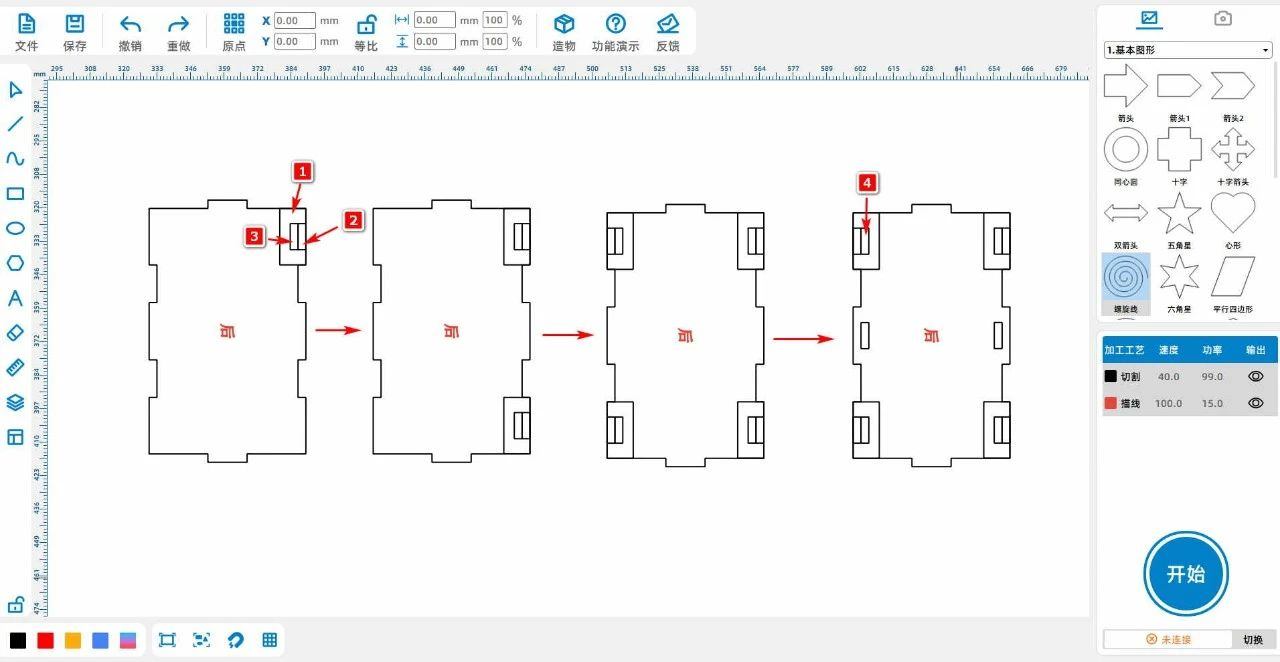
(6) Left click on the left toolbar of the mouse and select 'Rectangle' to draw a rectangle1Set the width and height to“10、21.6”, rectangle2、3Width and height are“3、10”;


Transform the rectangle1Align with the top right corner of the lower cover;


Transform the rectangle2、3Connected and connected to a rectangle1Center right alignment;


Select rectangle123Copy and paste it once and place it in the lower right corner of the cover;


Combine two sets of rectangles123 Copy and paste once, and horizontally mirror it once, aligning it on the left side of the lower cover;


Select rectangle3、4Copy and paste it once, and move it to the middle of the lower cover, as shown in the following figure:
41ebe220a6705137ca46aff76104e39f.jpg

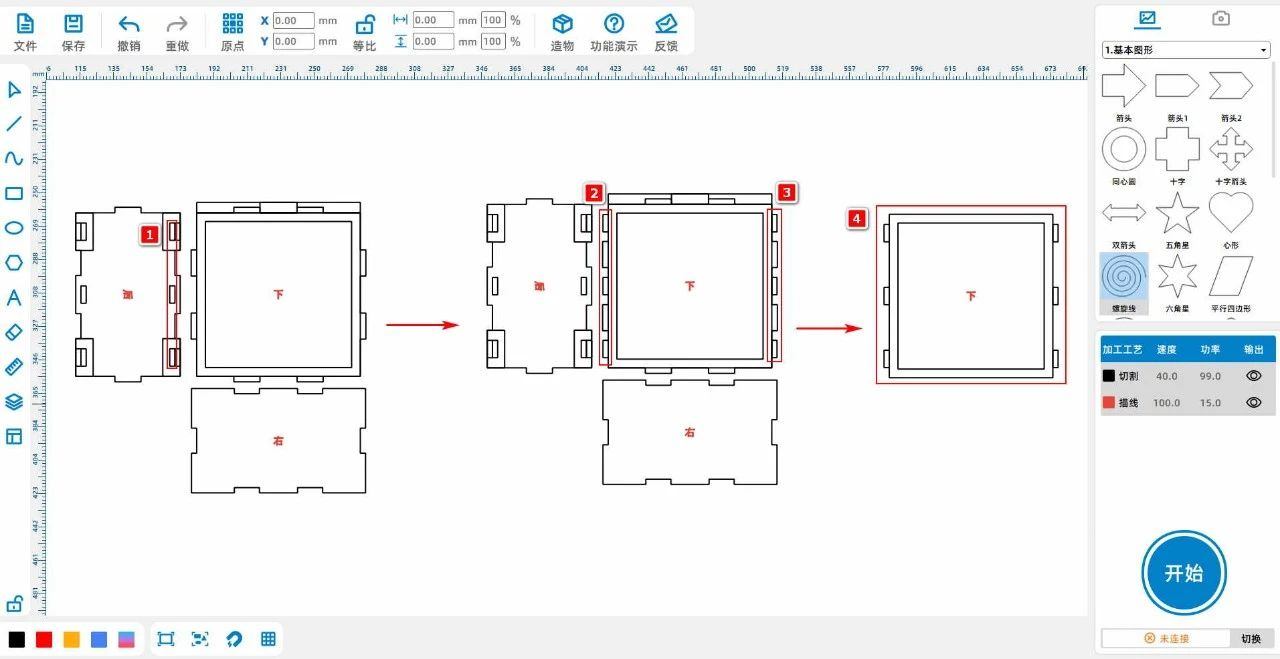
(7) Select the red area with the left mouse button1Copy and paste the three rectangles inside twice, and place them on the left and right sides of the lower cover;


Select the red area2、3Copy and paste the rectangle inside and the two rectangles inside the lower cover once to obtain the red area4Internal pattern;


Then merge the outer rectangle with the six rectangles on both sides, as shown in the following figure:
756d7b9b66a9cb136e6c81b89ab76e43.jpg

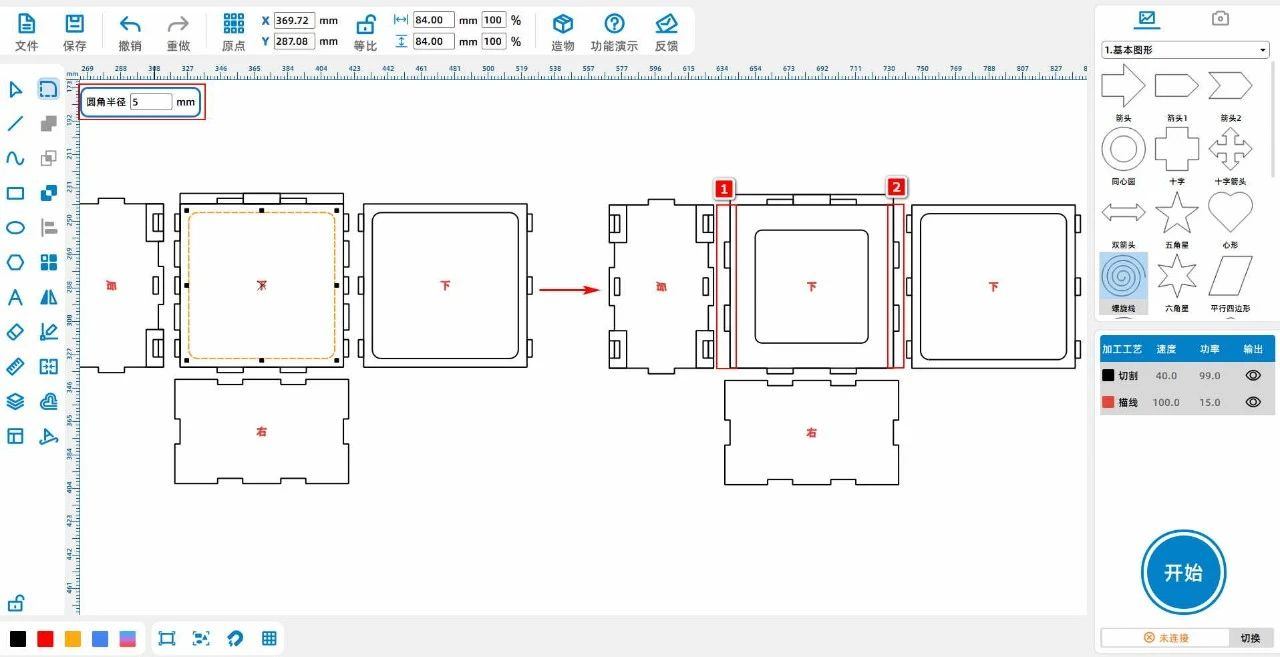
(8) Left click on the rectangle and set the fillet radius to“5”Set rounded corners on the inner rectangles of the two lower covers respectively;


Delete the three rectangles on both sides of the left lower cover and modify the size of the inner rectangle to“65、65”As shown in the following figure:

1d777396862c8ec61cc00e25d2ebf27a.jpg

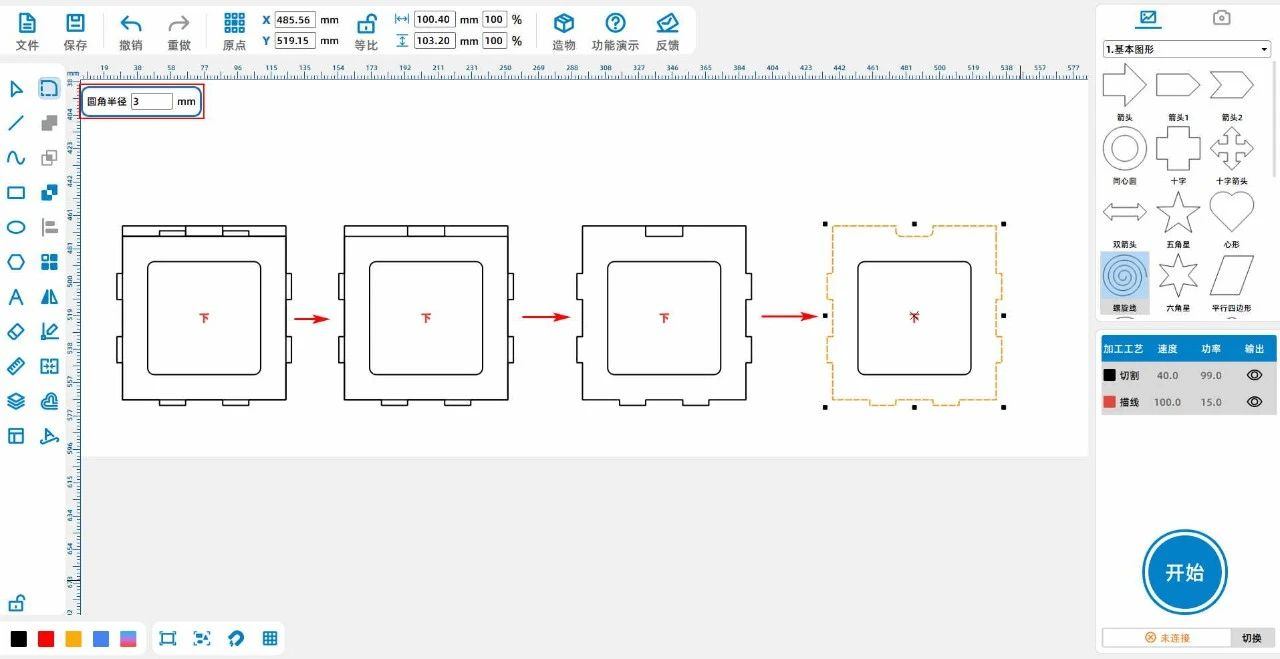
(9) Left click on the lower cover of the mouse and merge it with the long rectangle above;


Delete the large rectangle in the lower cover;


Click on the small rectangle at the top of the lower cover to perform 'difference collection';


Click on the bottom cover and set the fillet radius to“3”To round the groove, as shown in the following figure:
f4e754e69e3940781eee601ebadff78f.jpg

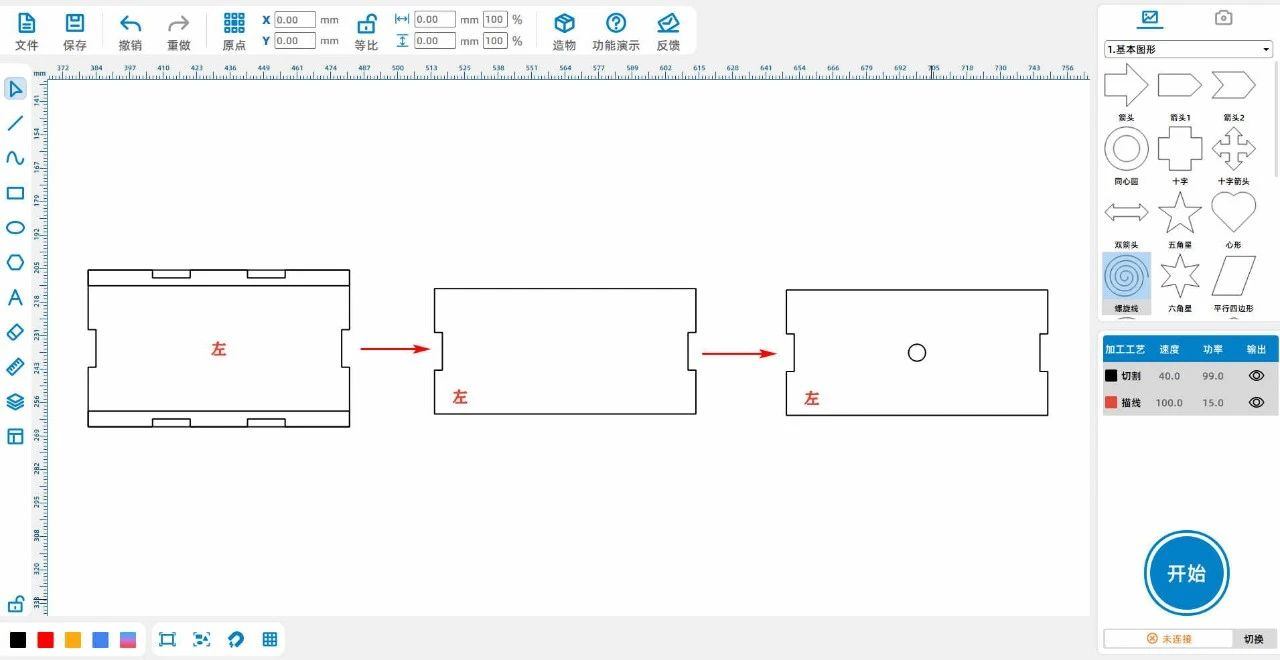
(10) Left click on the left toolbar of the mouse and select 'Rectangle' to draw two rectangles with a width and height of“100、6”Place it on the upper and lower sides of the left cover;


Click on the two rectangles and perform 'difference sets' separately;


Draw the diameter as“6”Align the center of the circle with the left cover horizontally, as shown in the following figure:
    2585889eb48c78bc917031b11b87e98d.jpg

Tips:A perfect circle is a switch for placing ambient lights.

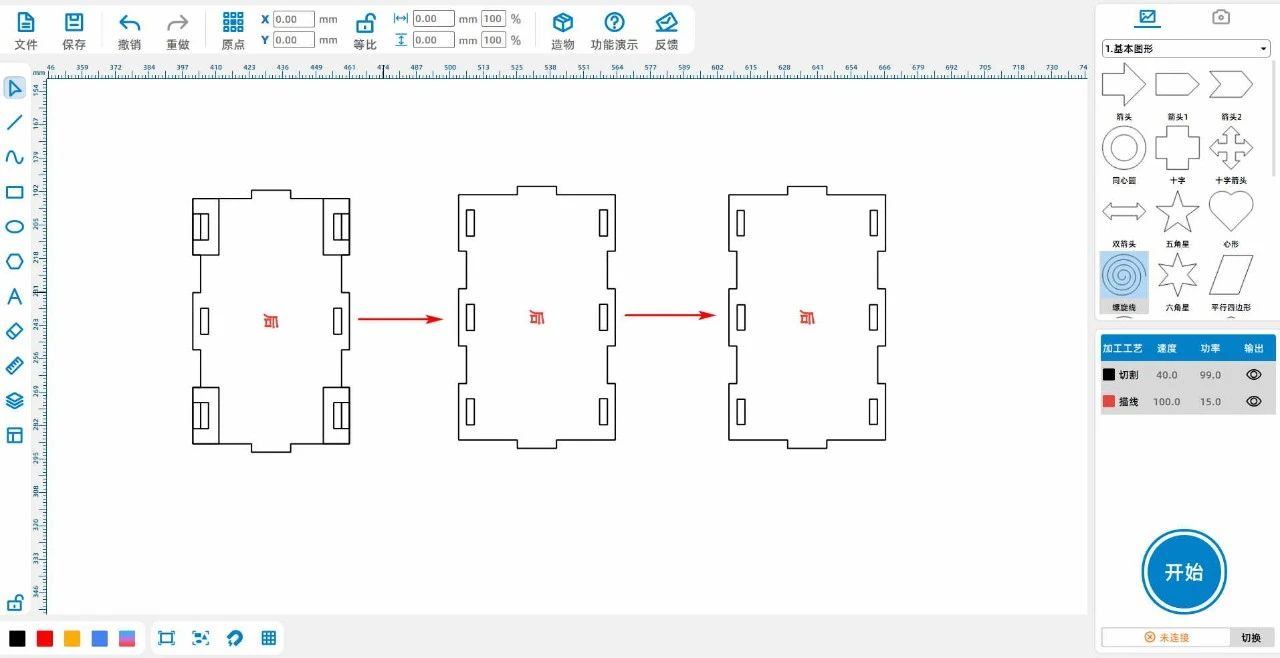
(11) Remove excess rectangles from the back cover to obtain Figure 2;


Separate the width and height of the six rectangles in the back cover-0.3As shown in the following figure:
b26dd9046767aa7f11639b1981f47917.jpg

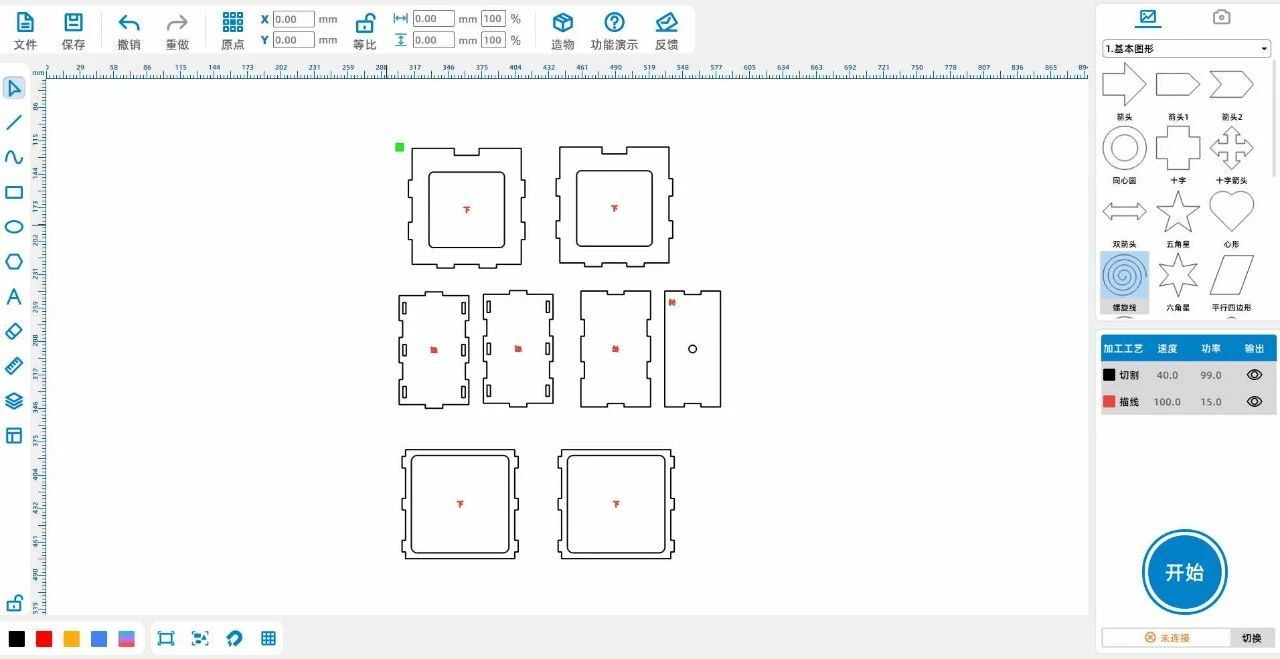
(12) Copy and paste the two lower covers and the back cover once;


Through the above operations, obtain all the drawings of the square frame of the ambient light, as shown in the following figure:
192ed0509ab1a4141749bdfe8d2fda07.jpg


Acrylic pattern design

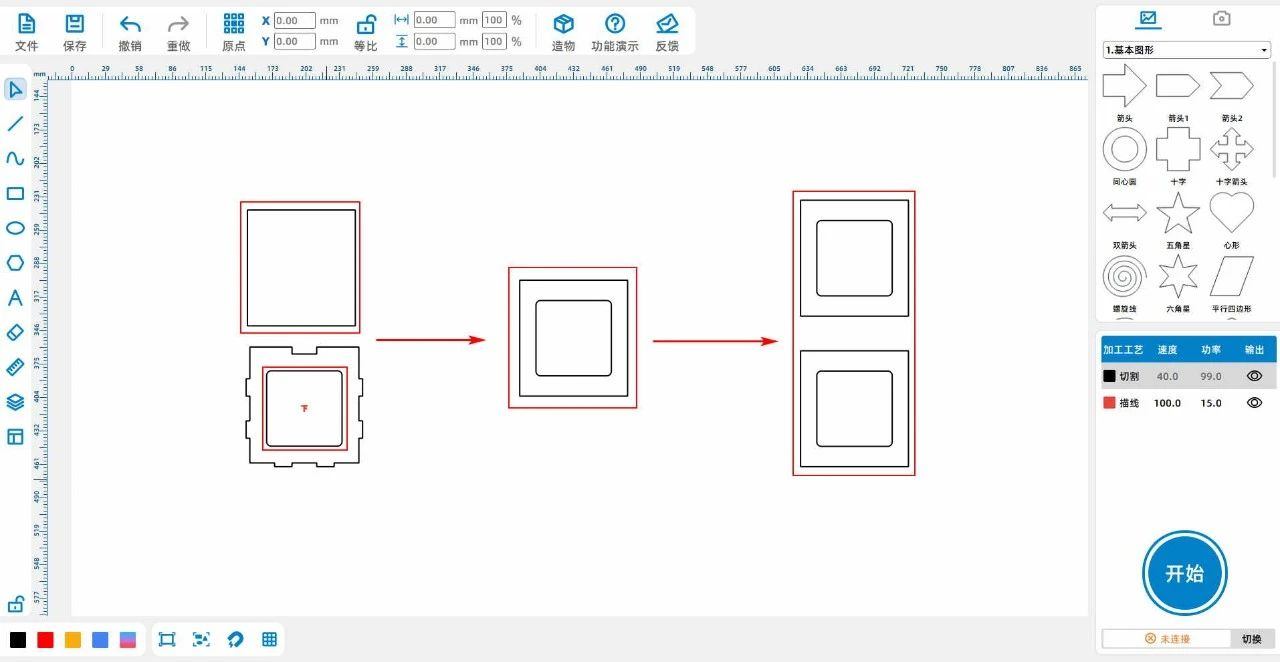
(1) Left click on the left toolbar of the mouse and select 'Rectangle' to draw a rectangle1The width and height are“93、100”;


Copy and paste the small rectangle inside the lower cover once, and move it to the rectangle1The central;


Transform the rectangle1Copy and paste the small rectangle once, as shown in the following figure:

eda52a554f13e4277e08f469474ca6e5.jpg

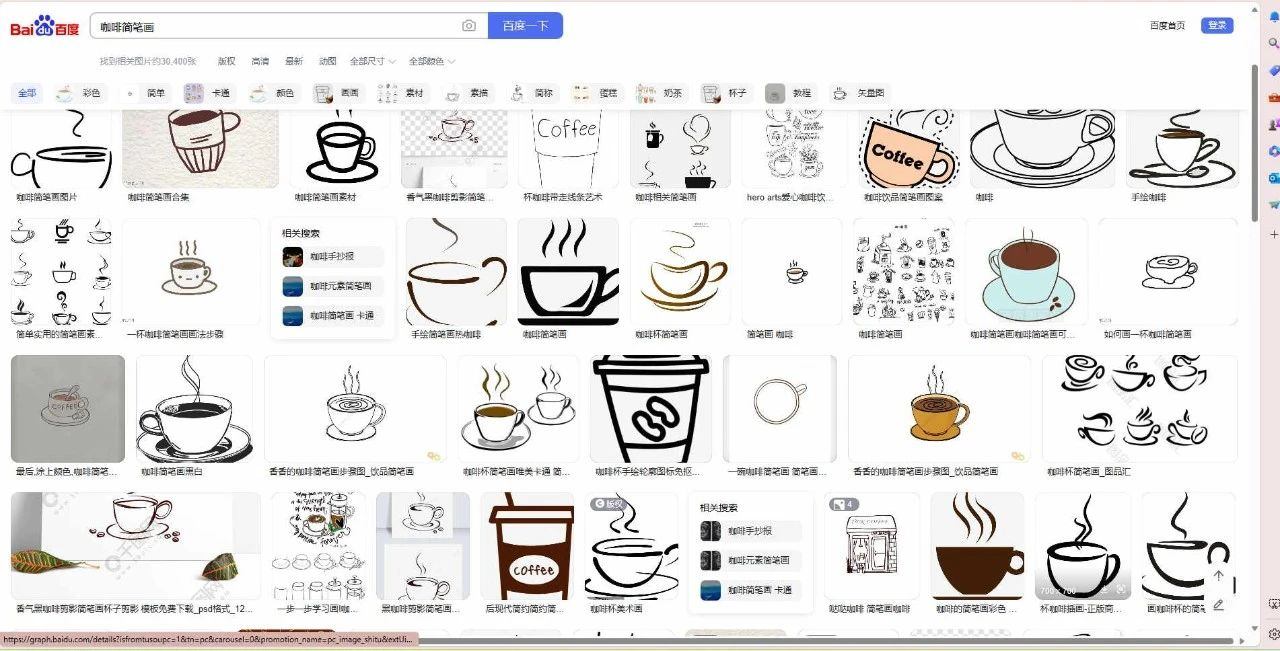
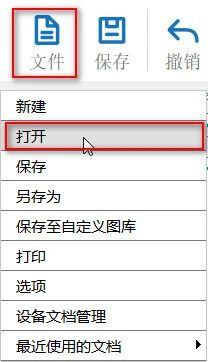
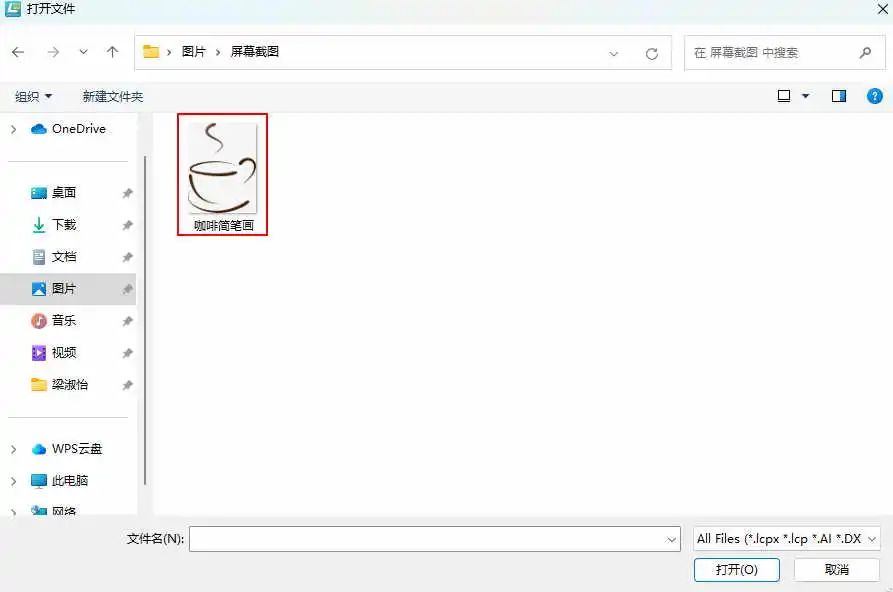
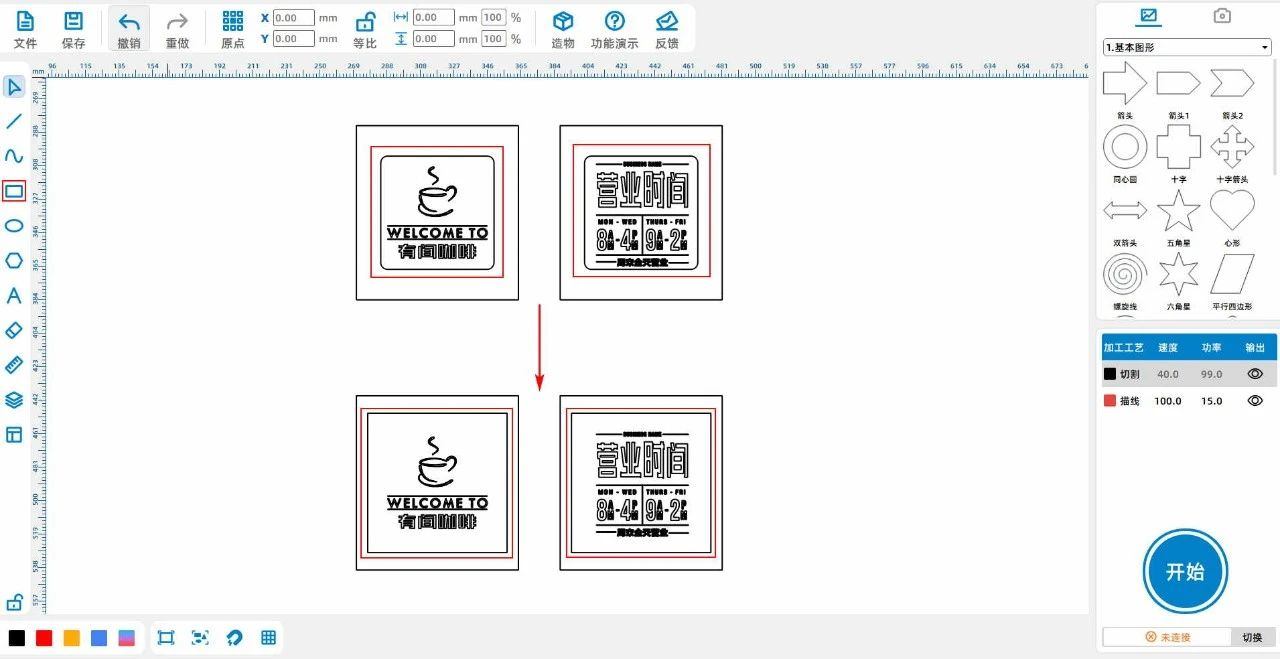
(2) Enter the keyword "Coffee Sketches" in "Baidu Images" and select your favorite image to save; Click on 'File' in the 'Function Area' above, and then click on it


【 Open 】 Double click to open the saved coffee sketch image, as shown in the following figure:

ac7b7bff4ecbf6b71c516eba195ce924.jpg

815827230286a8a0f599097d7c50938e.jpg3890993ae67db39fca5e9cd62d43bdfb.jpg

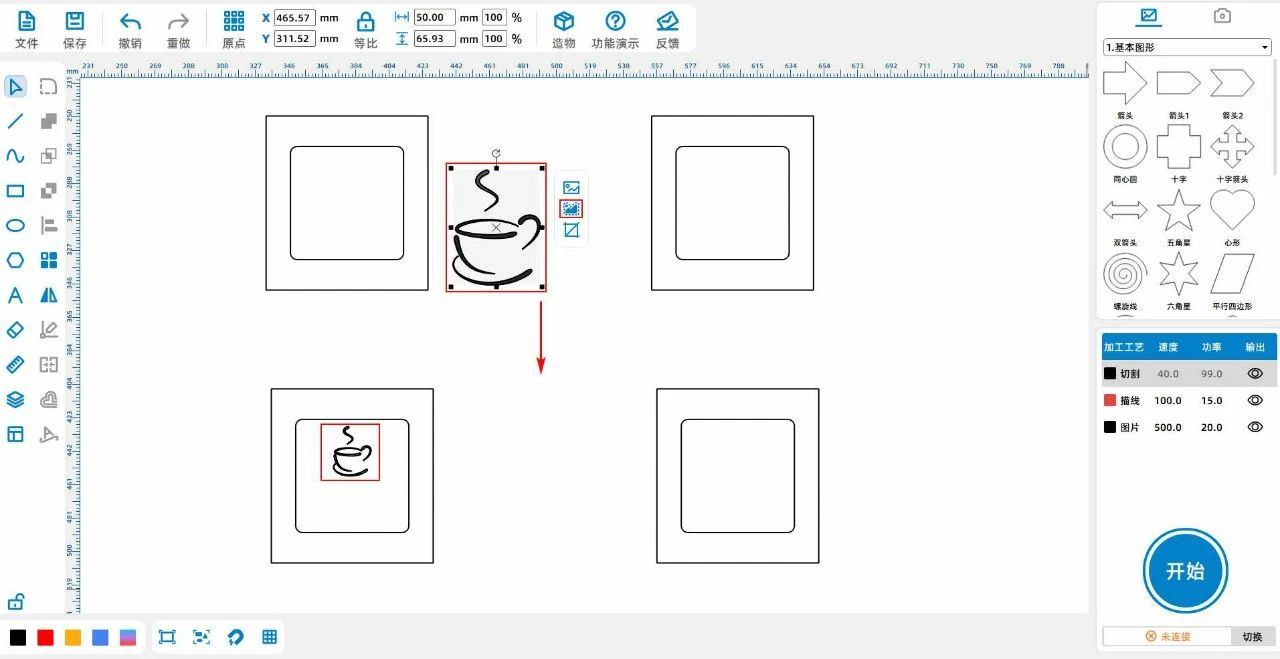
(3) Click on the coffee image with the left mouse button, click on 'Contour Drawing' to obtain the coffee's lines, adjust their size, and move them to the inside of the left rectangle, as shown in the following figure:

3981ec28aa4488d4e048b878f05a06bf.jpg

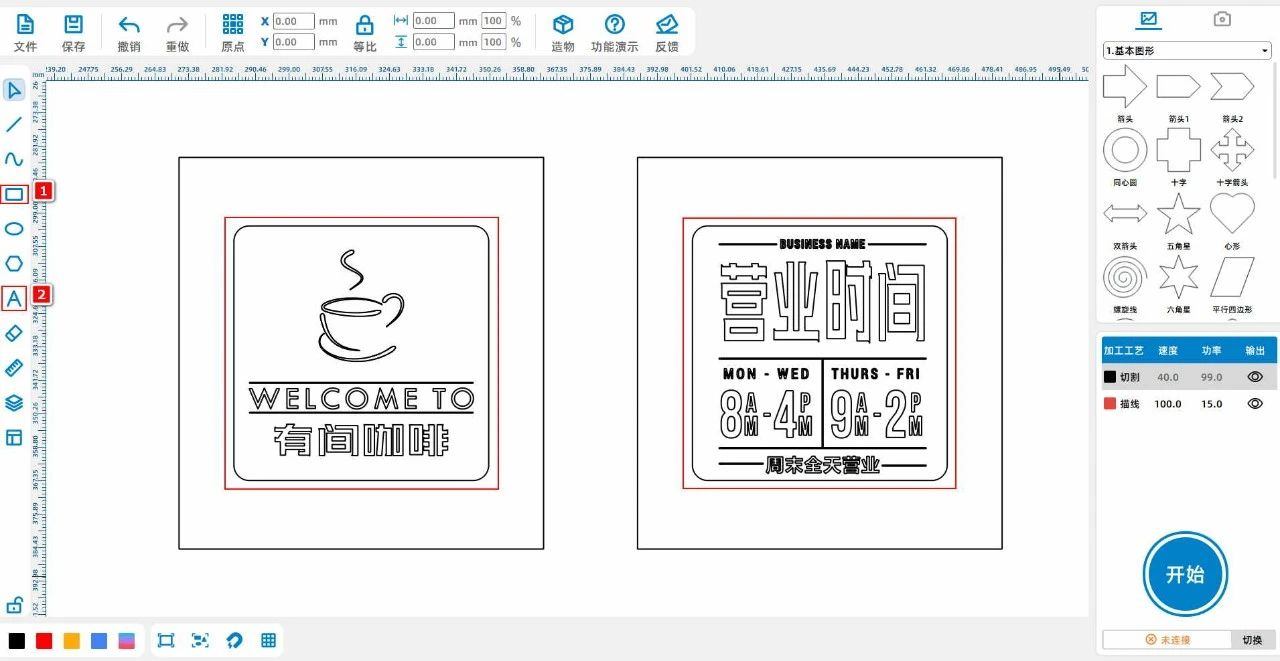
(4) Left click on the 'Rectangle' and 'Font' in the left toolbar of the mouse, and use these two tools to draw your favorite text and lines within the small rectangle, as shown in the following figure:

36d01a9f4048c4357884658fe565f8f8.jpg

(5) Select two small rectangles with the left mouse button and click on the keyboard【Delete】Delete it;


Left click on the left toolbar of the mouse and draw two rectangles with a width and height of“80、80”Place the rectangles in the middle of two large rectangles, as shown in the following figure:

fd59a20731f49be8ae481a4c2a417db5.jpg


Laser processing

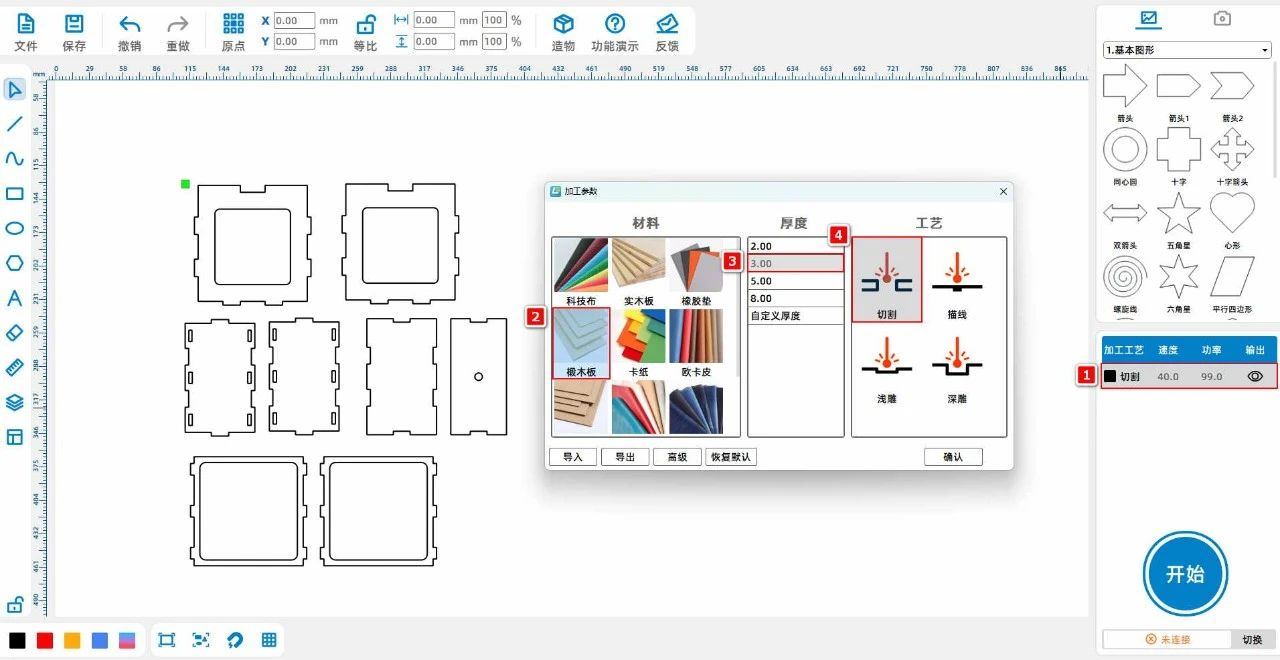
1、 Square frame process parameter setting

(1)Double click the black layer with the left mouse button to set the material, thickness, and process to oak board3mmCut, as shown in the following figure:

2943f6a6c02fb7abb307f931ac518bc5.jpg

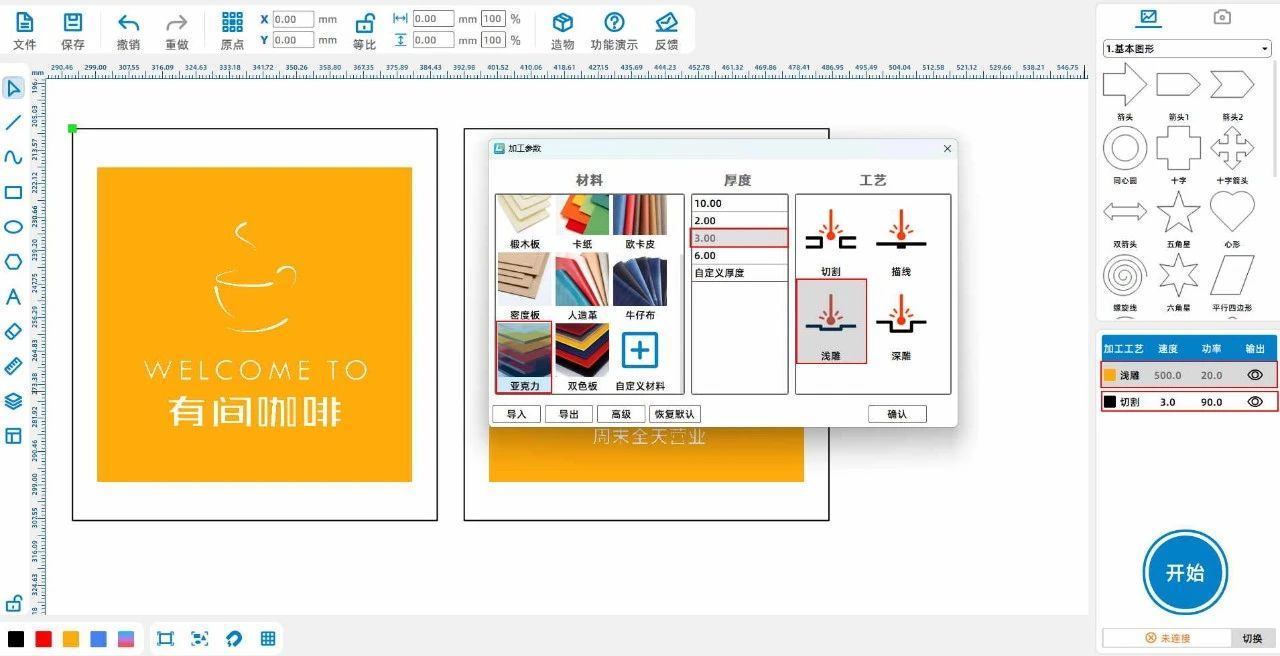
(2)Double click the yellow layer with the left mouse button to set the material, thickness, and process to acrylic3mmShallow carving; Double click the black layer with the left mouse button to remove the material and thickness

The degree and process are set to acrylic3mmCut, as shown in the following figure:

a83bb9eae302c6dd1f516b52067db74f.jpg


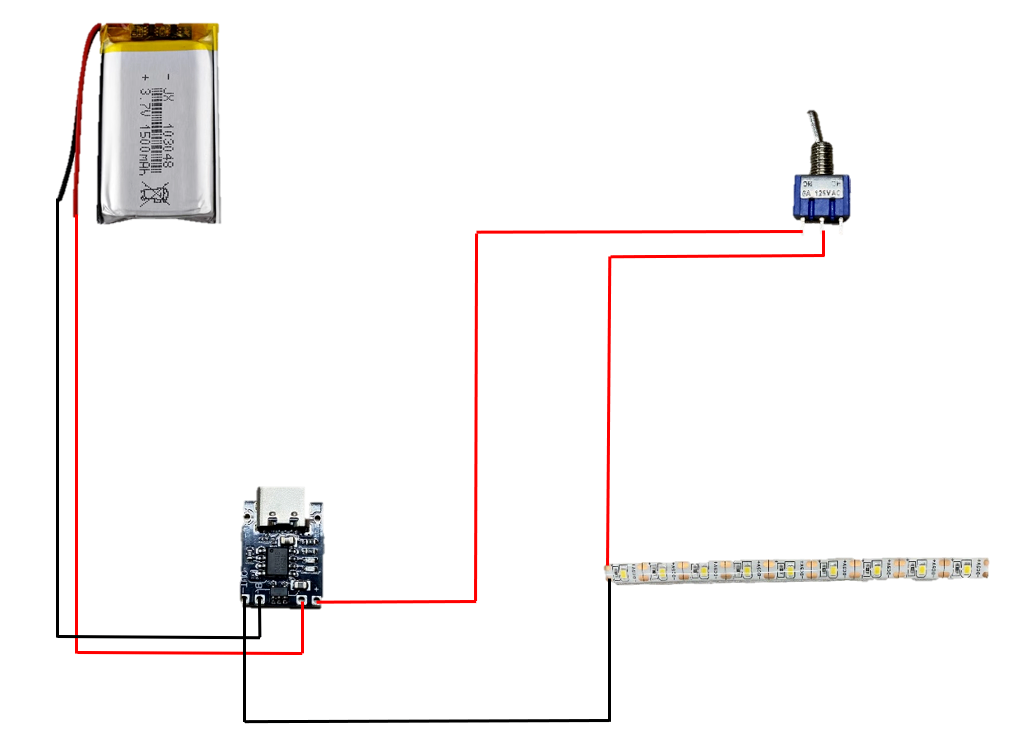
circuit connection

24070e630e2561a1f7167e89d82a7a65.png

structural assembly

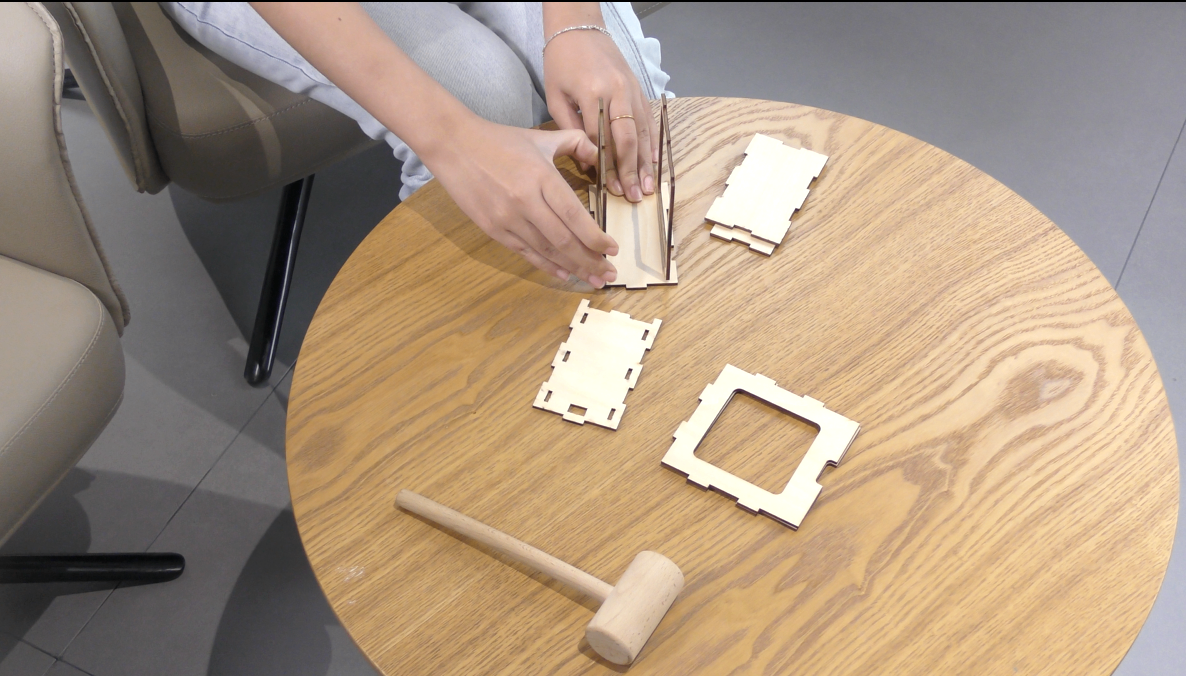
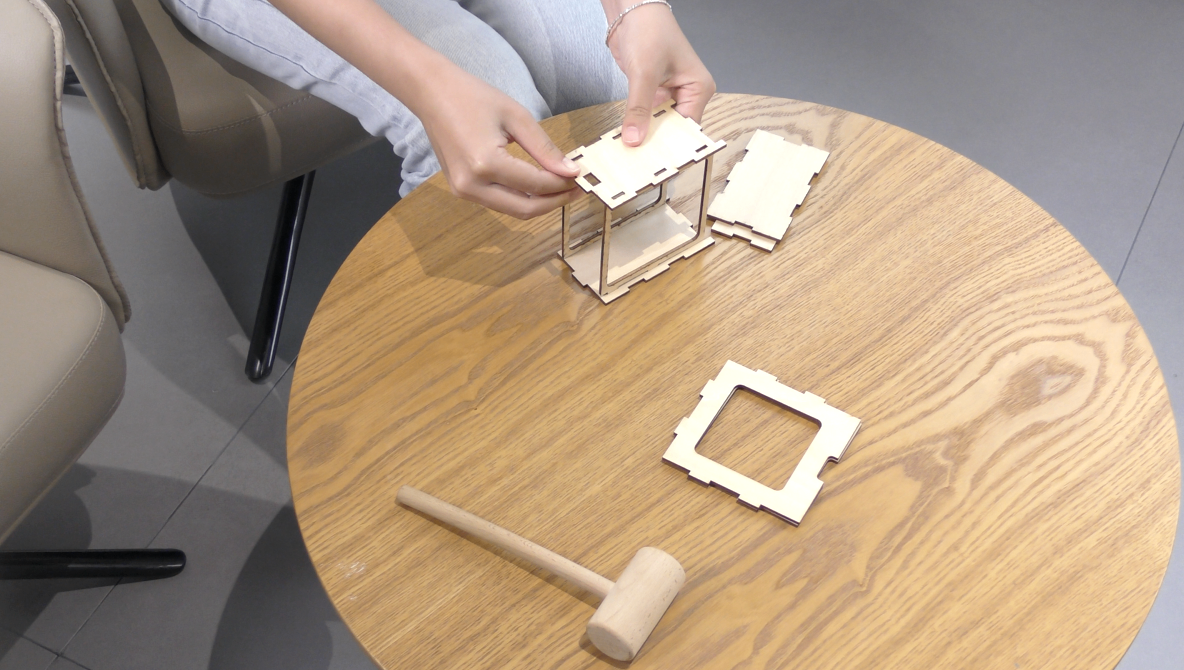
First, assemble the left and right covers with the two small front and rear covers; Assemble the bottom cover again, followed by the top cover; Finally, assemble the two large front and rear covers.

                                                                      Square frame

6191b4f2a4897a797e0e29fc65c95203.png853a90defc3b44f84c7a57e9a02a63b5.png

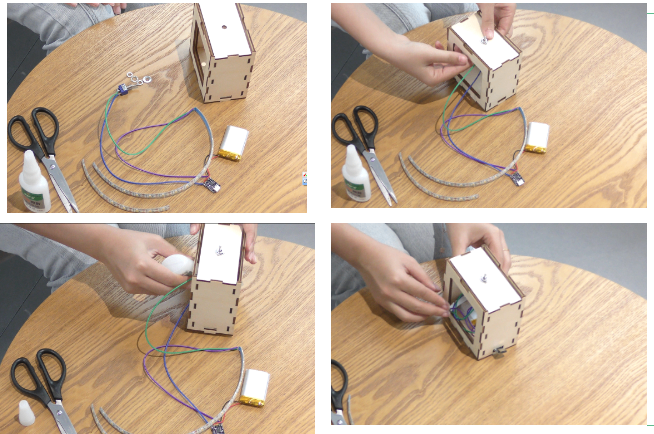
First, place a nut and a washer at the switch, wait for them to pass through the circular hole on the upper cover, and then screw in the other nut and washer to fix the switch; Apply glue inside the square frame and fix the various components of the circuit inside to combine the circuit with the outer frame.

                                   image.png

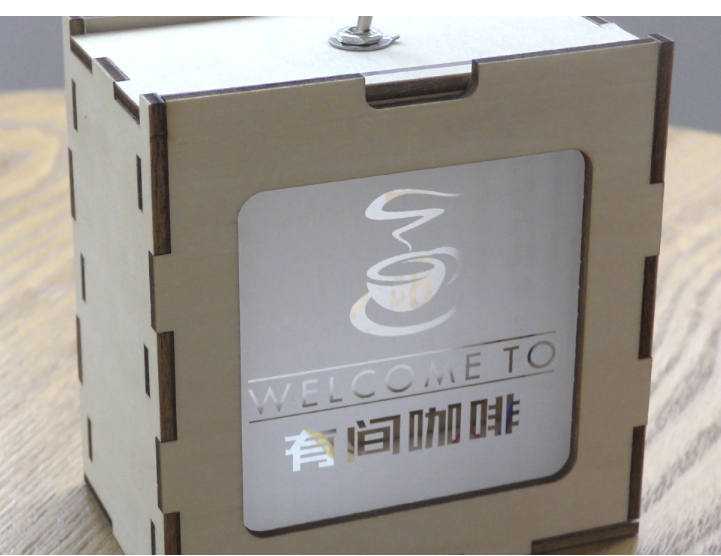
Insert two acrylic patterns into the square frame to complete the assembly.

Works Display

image.png

Summary:

    This course belongs to the advanced class course. In terms of the external framework, the young designers need to first conceptualize and think about how to connect the structure. The structure obtained in the creation needs to be further developed

Further design is necessary to obtain the external framework of the ambient light.

Next is the connection of the circuit, which will be connected using an electric soldering iron. Small designers need to have a certain understanding of circuit connections in order to connect the circuit correctly!


There is a certain level of difficulty in the operation process, so little designers need to be careful in their operations!


comment (0)
Most pictures available 10 Zhang · Attachment support dxf/plt/lcp/lcpxAt most 3 a
将图片拖拽到这里或点击“选择图片”上传(支持多张)
Laser Creation into Class Course | Case 2:DIYambient lighting
drawing ID: SUCAI-41 2024-4-8 17:12
3
1
0
154
0Contribution points
Purchase points
collection
like
Grade discount
Basic Information
Update time 2024-4-8 17:12
advertisement