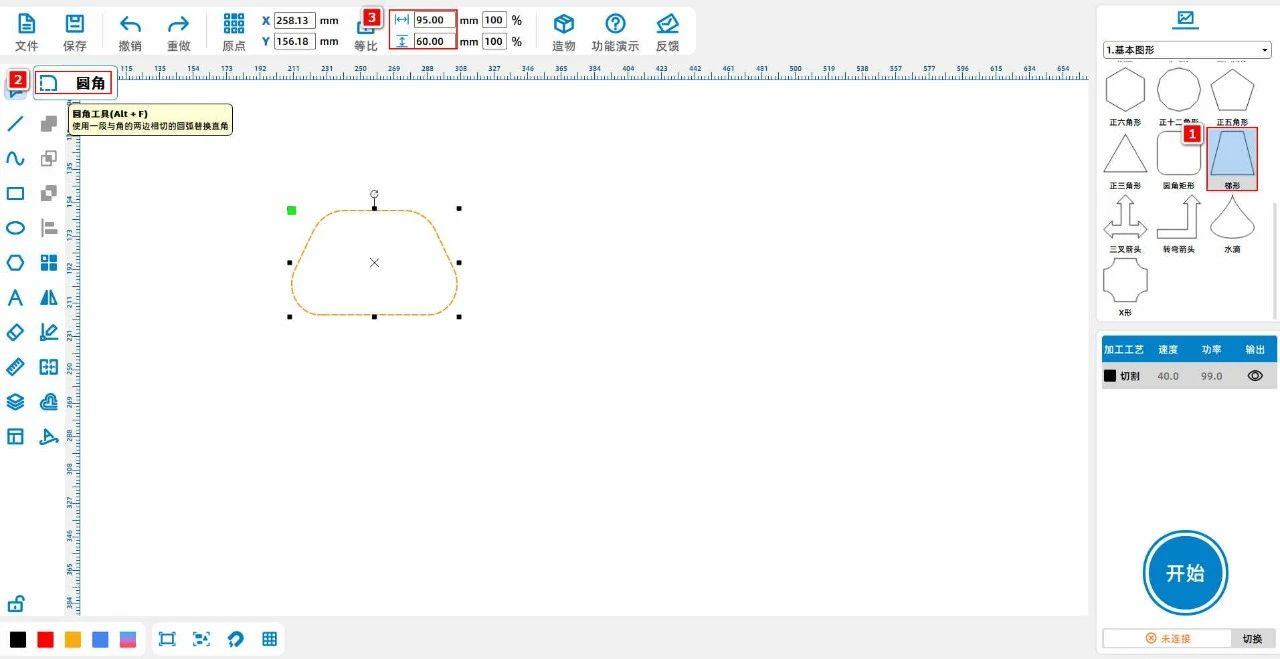
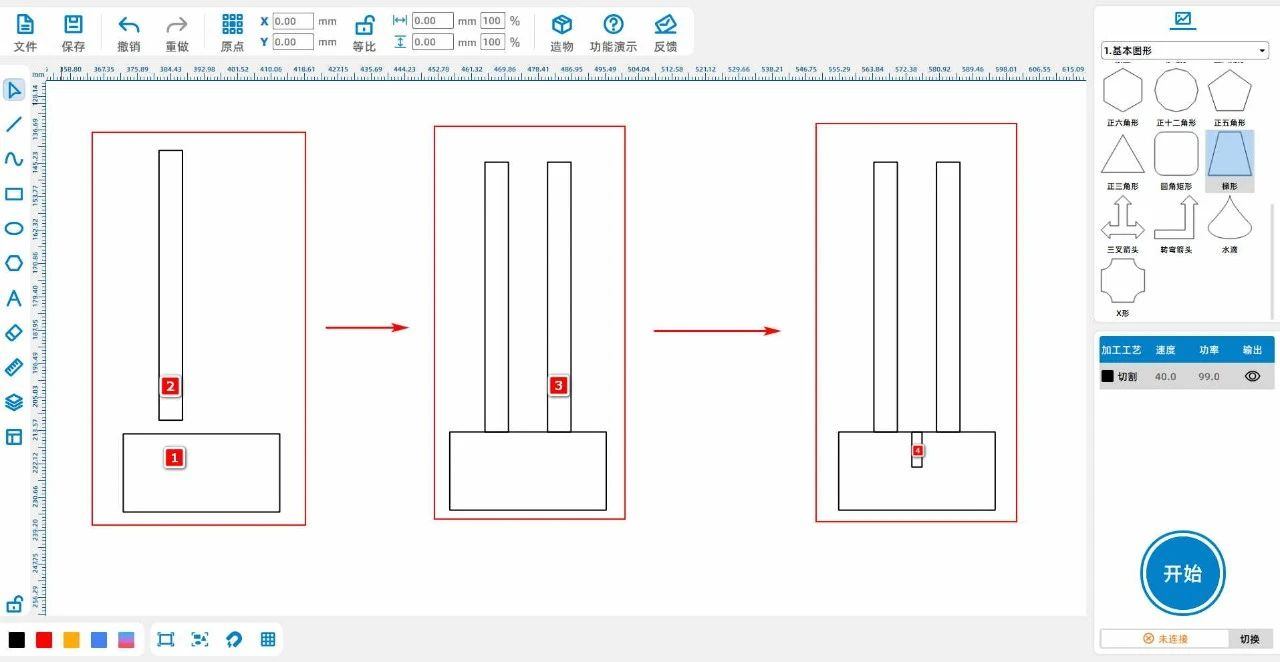
(1) Select "trapezoid" from the "basic shapes" in the upper right corner, click on the shape, and select the "fillet" tool from the left toolbar to round the four corners of the trapezoid; adjust
The size of the trapezoid is up to 'width'95, Gao Wei60”As shown in the following figure:
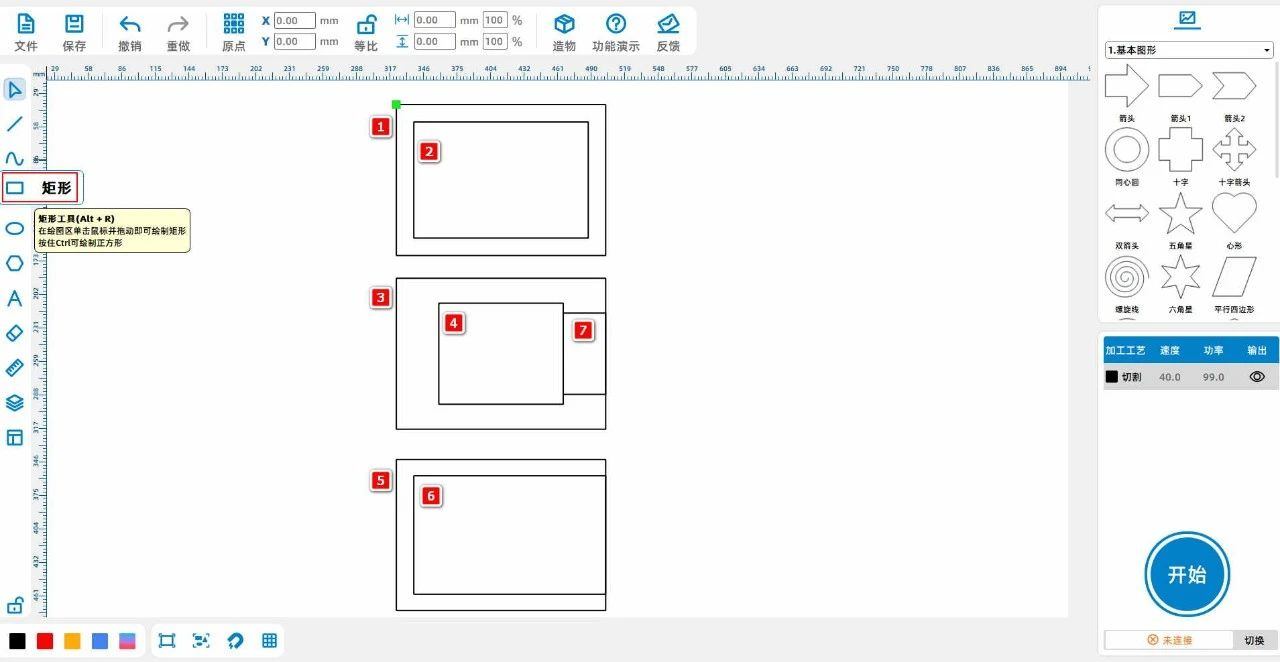
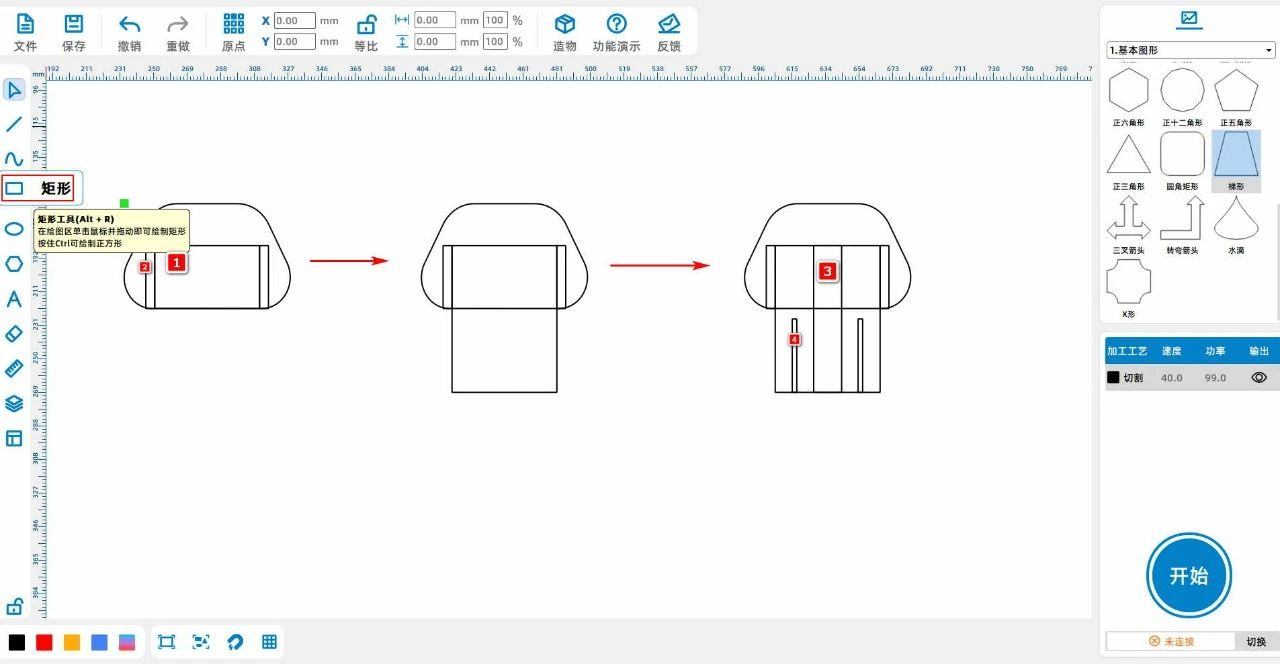
(2) Left click on the left toolbar of the mouse and use the 'Rectangle Tool' to draw two rectangles1For 'wide'60, high36”, rectangle2For 'wide'5.1, high36”, then transform the rectangle2copy and paste1Secondly;
Transform the rectangle1Align the trapezoid with the center first, then align it downwards, and place the other two rectangles separately into the rectangles1Left and right sides;
Click the left mouse button on the "Origin" in the top toolbar and select "Take the upper middle point as the origin" to move the rectangle1Change to 'High'84”;
draw a rectangle3The width16, high84”, associate it with a rectangle1Center alignment; draw a rectangle4The width2.6, high42”Copy and paste it once, then place the two rectangles in the position shown in the figure below:
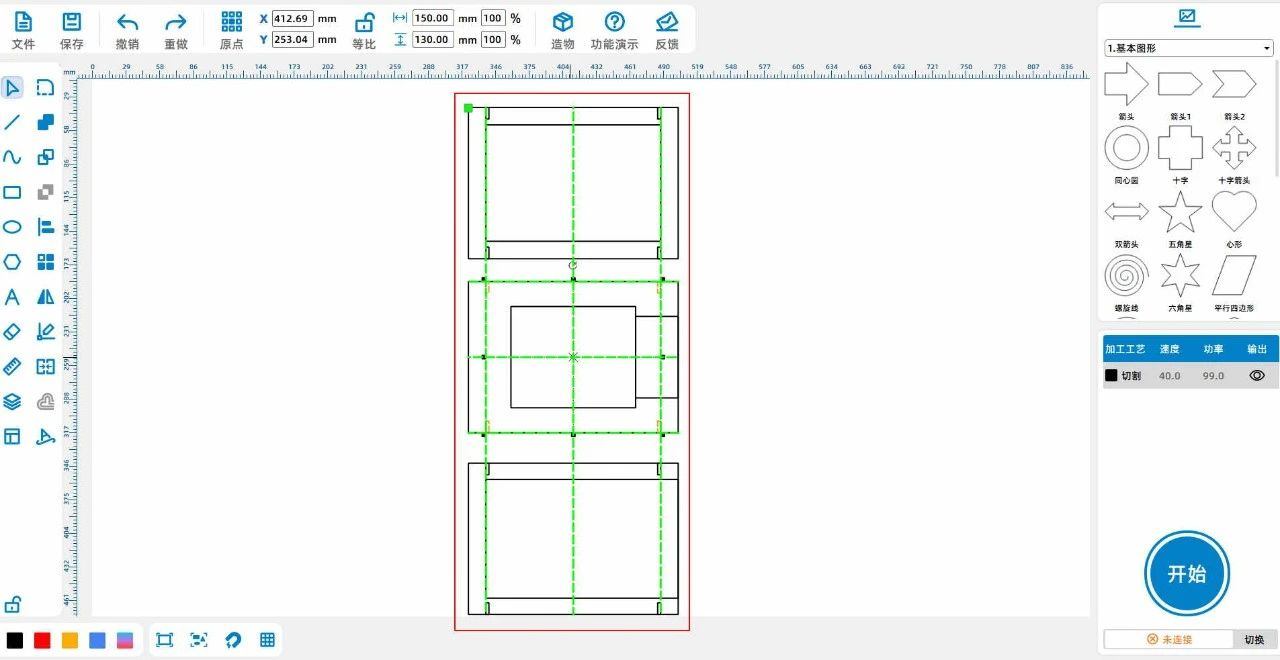
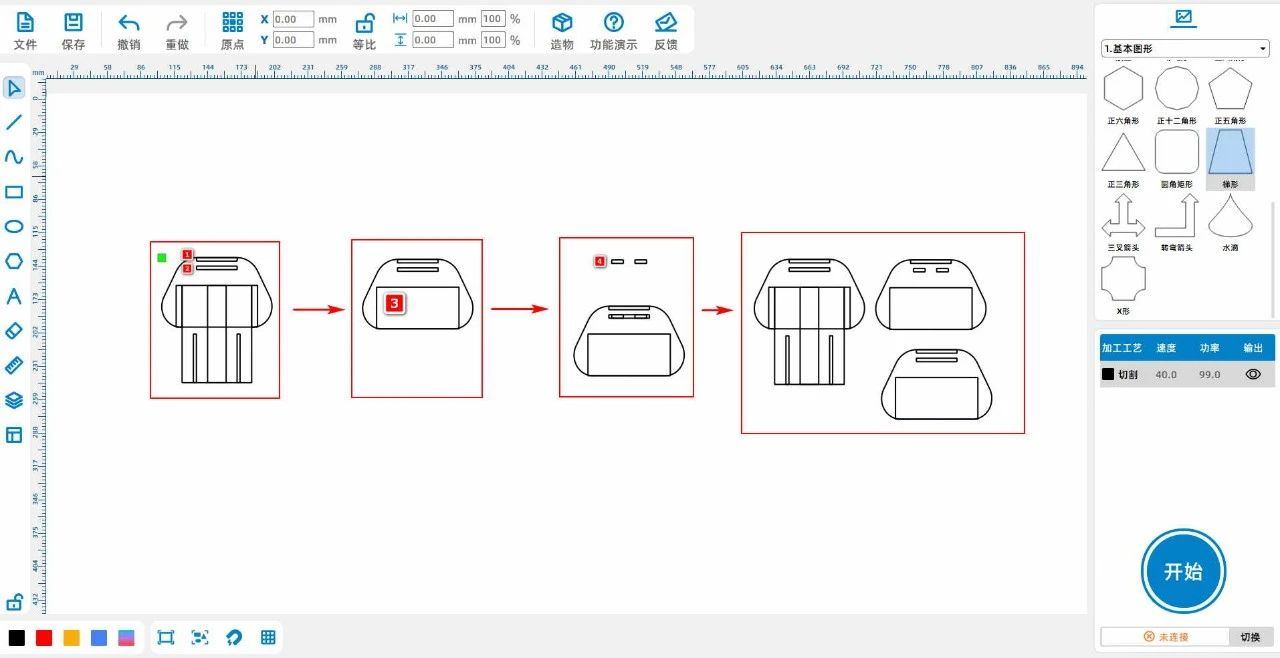
(3) Left click on the left toolbar of the mouse and use the 'Rectangle Tool' to draw two rectangles1For 'wide'35, high3”, transform the rectangle1[Array] Once, set the number of vertical arrays to2The array distance is4.35Obtain a rectangle2;
Left click to select trapezoids and rectangles1、2Copy and paste once to obtain a trapezoid shape1Compared to rectangles1.1、2.2;
draw a rectangle3The width71, high36”Compare it with a trapezoid1Center alignment and bottom alignment;
We will obtain a trapezoid shape1Compared to rectangles1.1、2.2, rectangle3Copy and paste once to obtain two identical patterns;
draw a rectangle4The width10, high3”The number of horizontal arrays is2The horizontal spacing is10Group two rectangles and combine them with rectangles2.2Align horizontally in the center and then align the rectangle2.2Delete, as shown in the following figure:
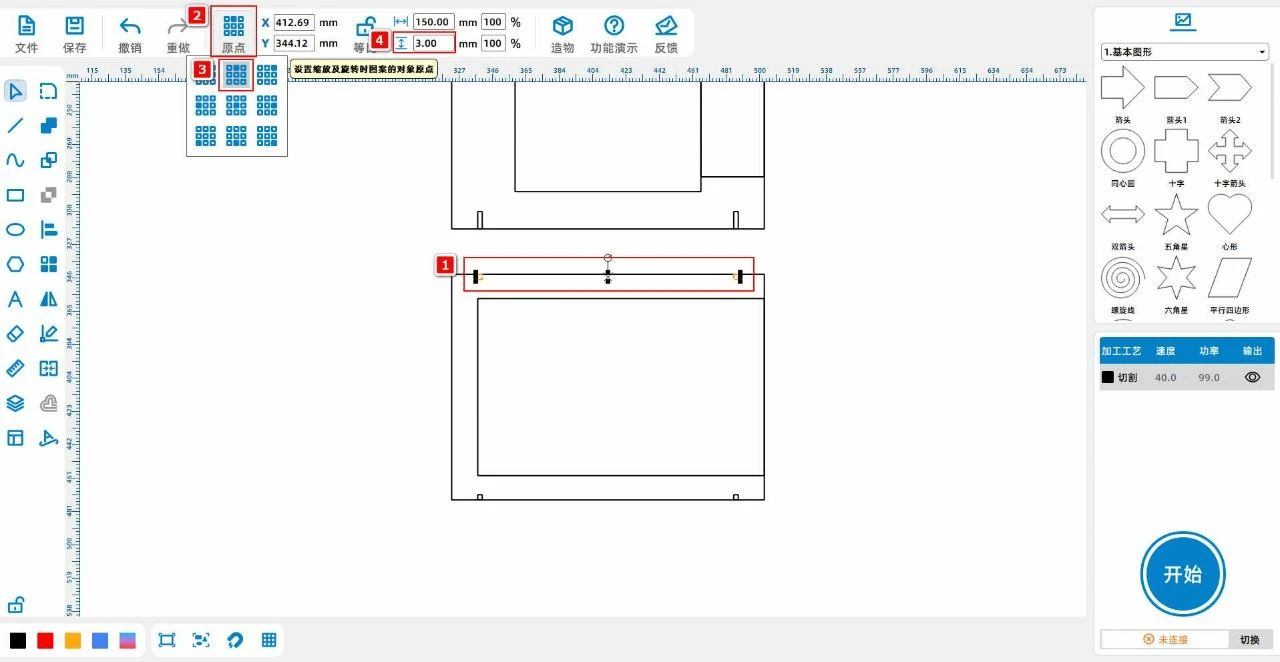
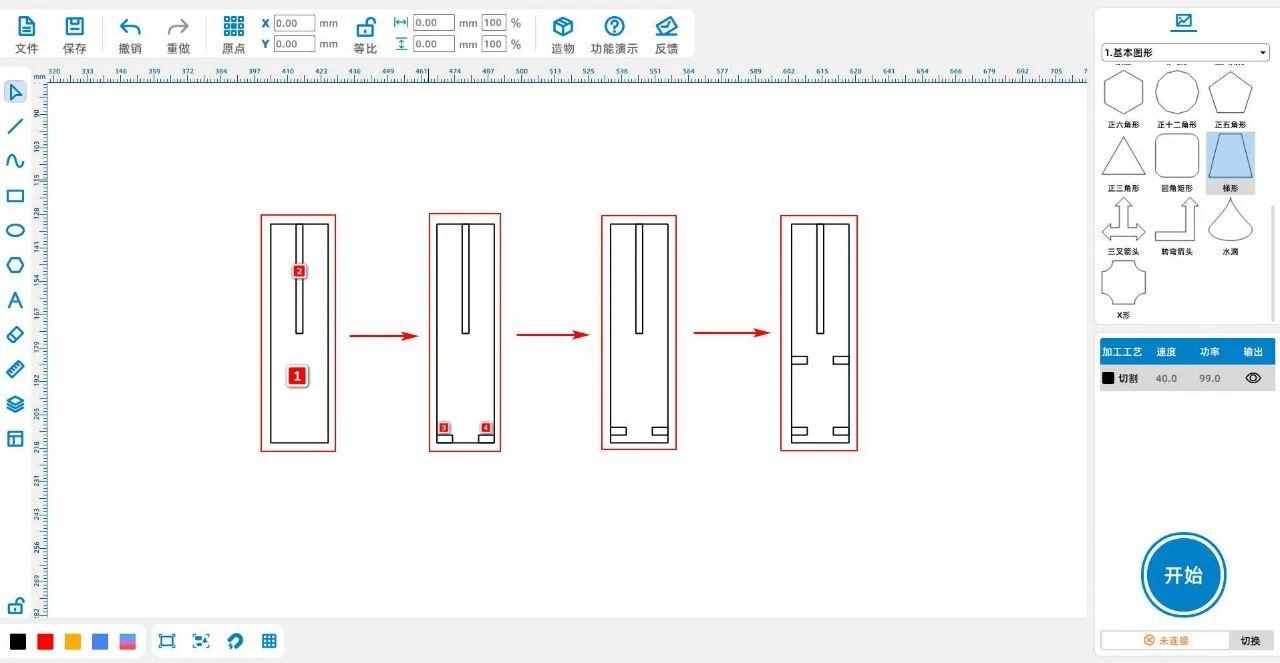
(4) Left click on the left toolbar of the mouse and use the 'Rectangle Tool' to draw two rectangles1For 'wide'22, high84”, rectangle2For 'wide'2.6, high42”Align the two rectangles' center 'and' top ';
draw a rectangle3Wide6, high3”Copy and paste to obtain a rectangle4Place the two rectangles separately into the rectangles1The bottom left and bottom right corners;
Transform the rectangle3、4Move upward 3mmAt the same time, transform the rectangle3、4Vertical array2The vertical array distance is-30.2mmAs shown in the following figure:
(5) Left click on the left toolbar of the mouse and use the 'Rectangle Tool' to draw two rectangles1For 'wide'40, high20”, rectangle2For 'wide'6, high69”, transform the rectangle2Horizontal array once, array distance is10Obtain a rectangle3;
Transform the rectangle2、3Group, get group1, group1Compared to rectangles1Center alignment;
draw a rectangle4The width2.6, high9”, compared to rectangles1Horizontal alignment and upward alignment, as shown in the following figure:
(6) Left click on the left toolbar of the mouse and use the 'Rectangle Tool' to draw two rectangles1For 'wide'36, high10”, rectangle2For 'wide'3, high35”Align the two rectangles horizontally, rectangles1Right side and rectangle2Connected on the left side ";
Transform the rectangle1copy and paste2Next, obtain a rectangle3、4, rectangle3Move to rectangle1Connected at the top, rectangular4Move to rectangle1Connect the lower end and then connect the rectangle1Delete, as shown in the following figure:

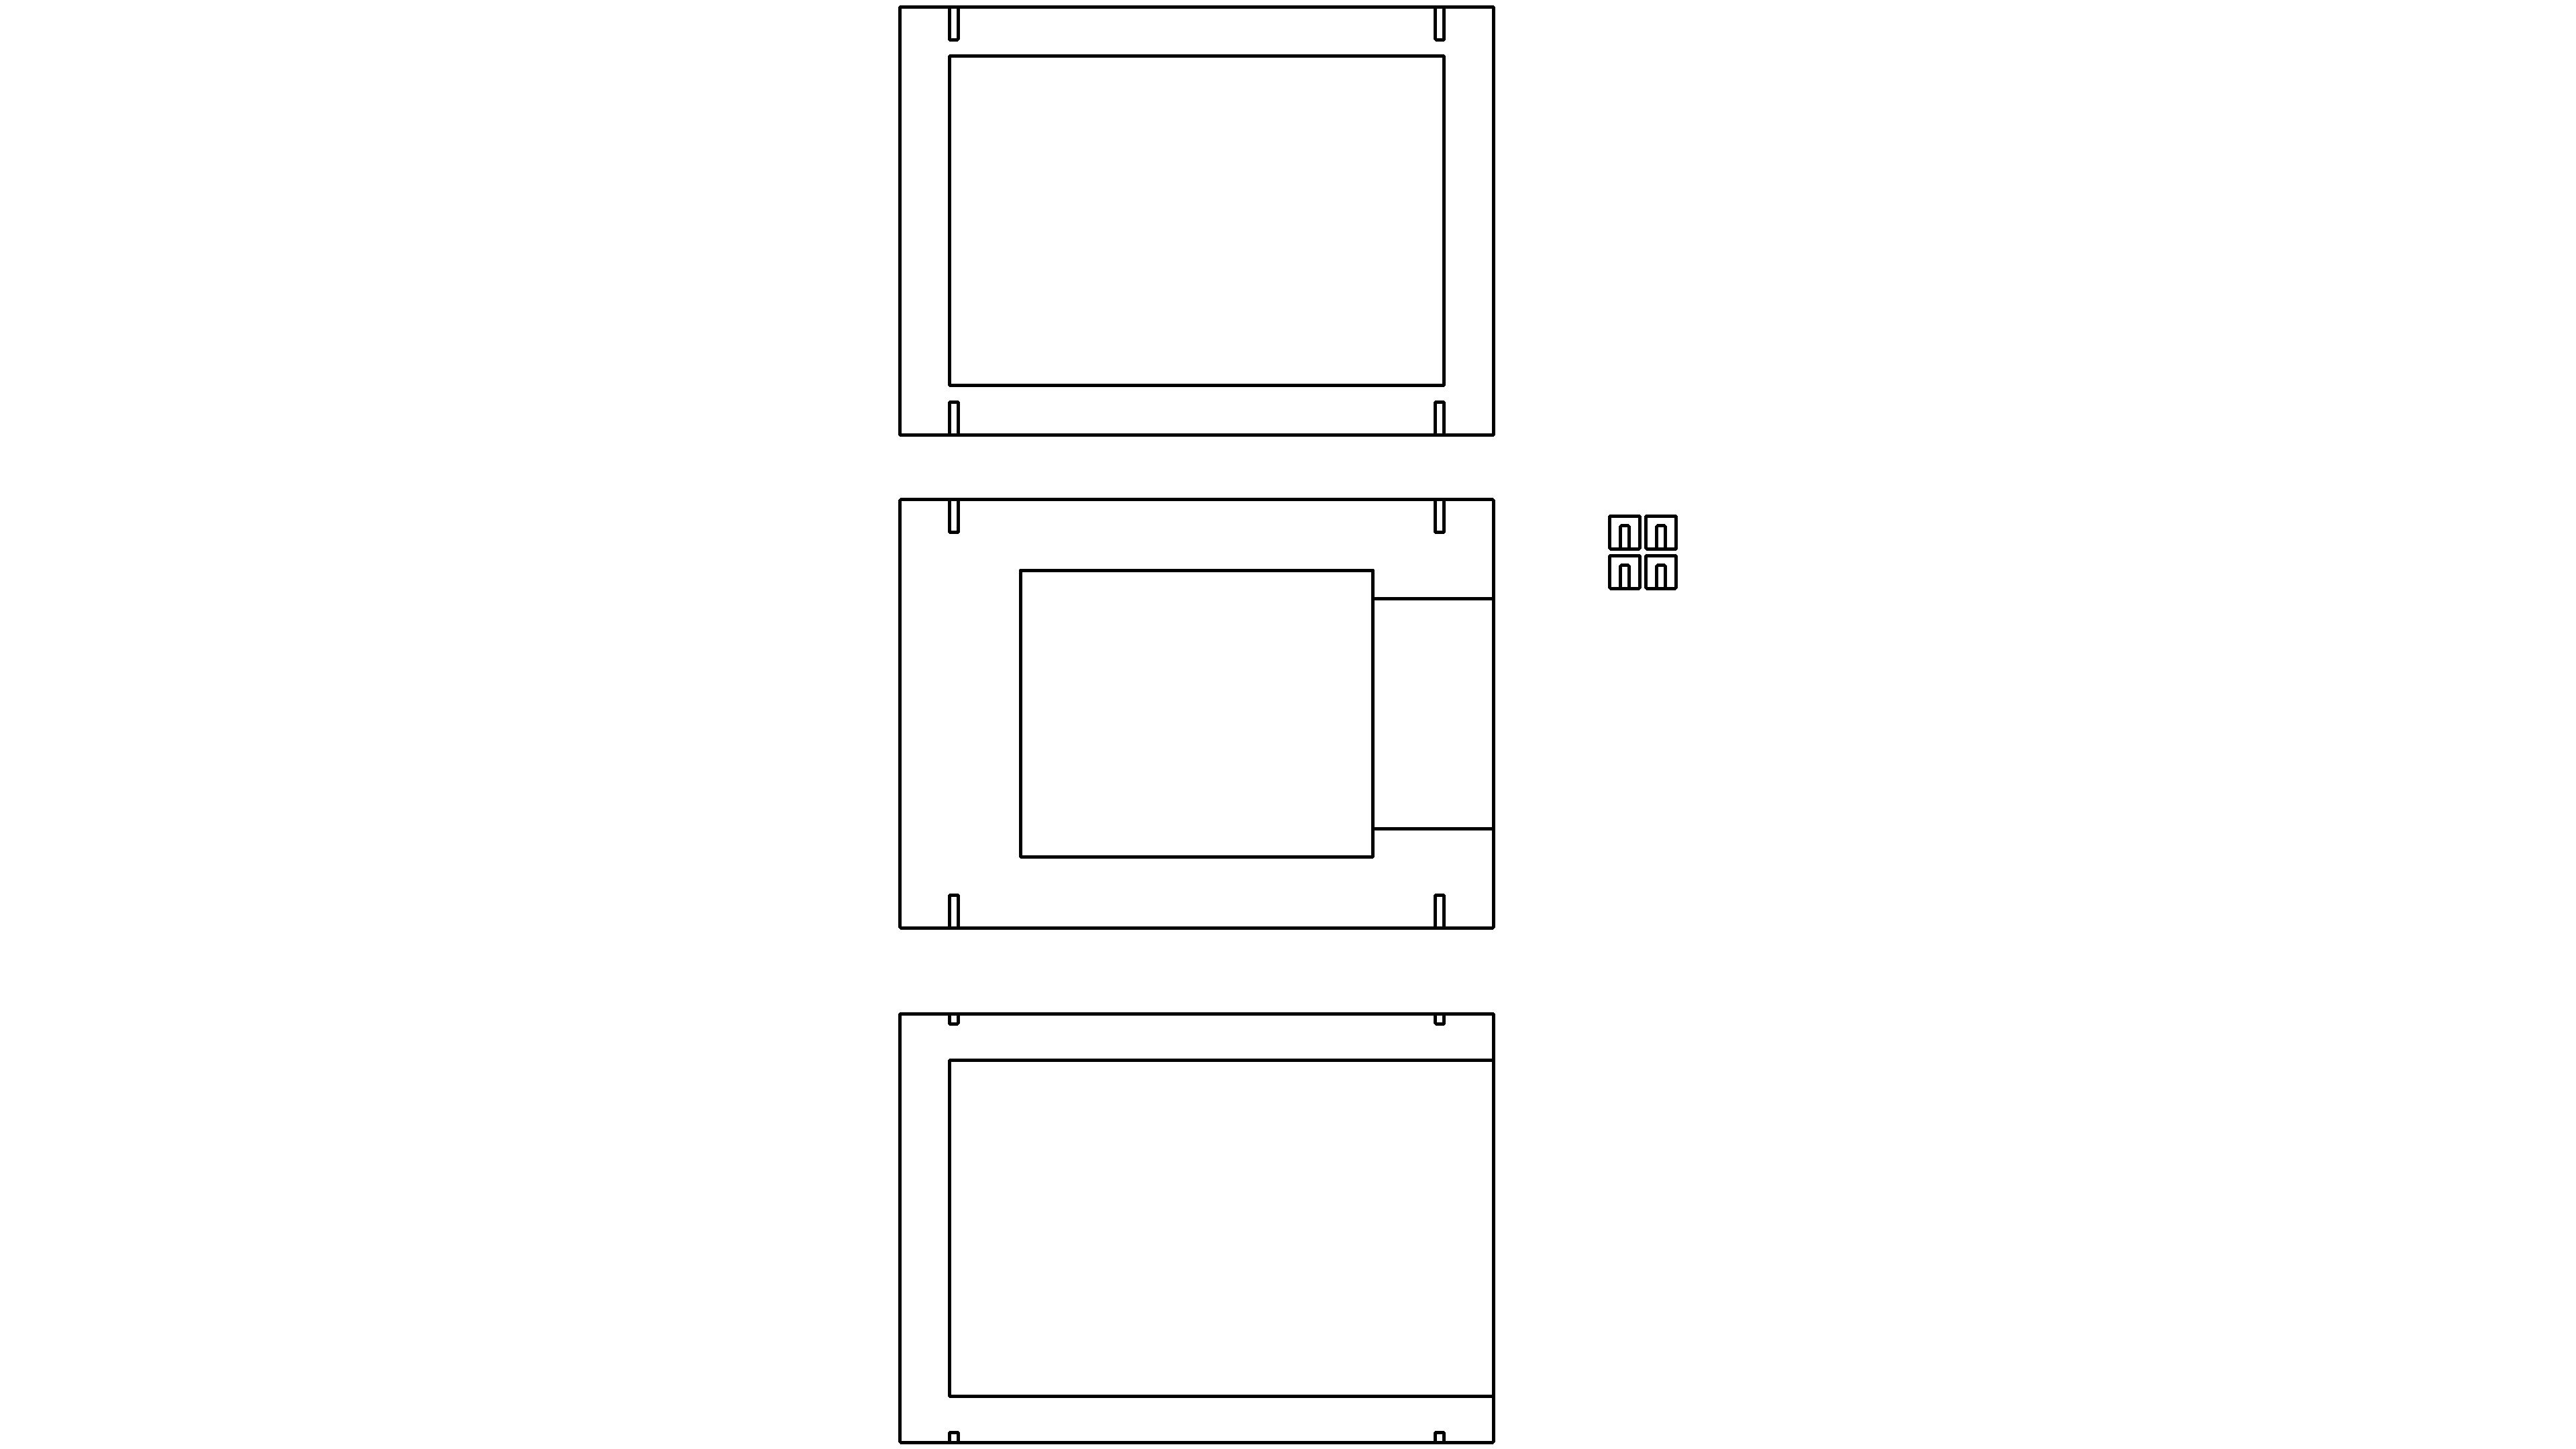
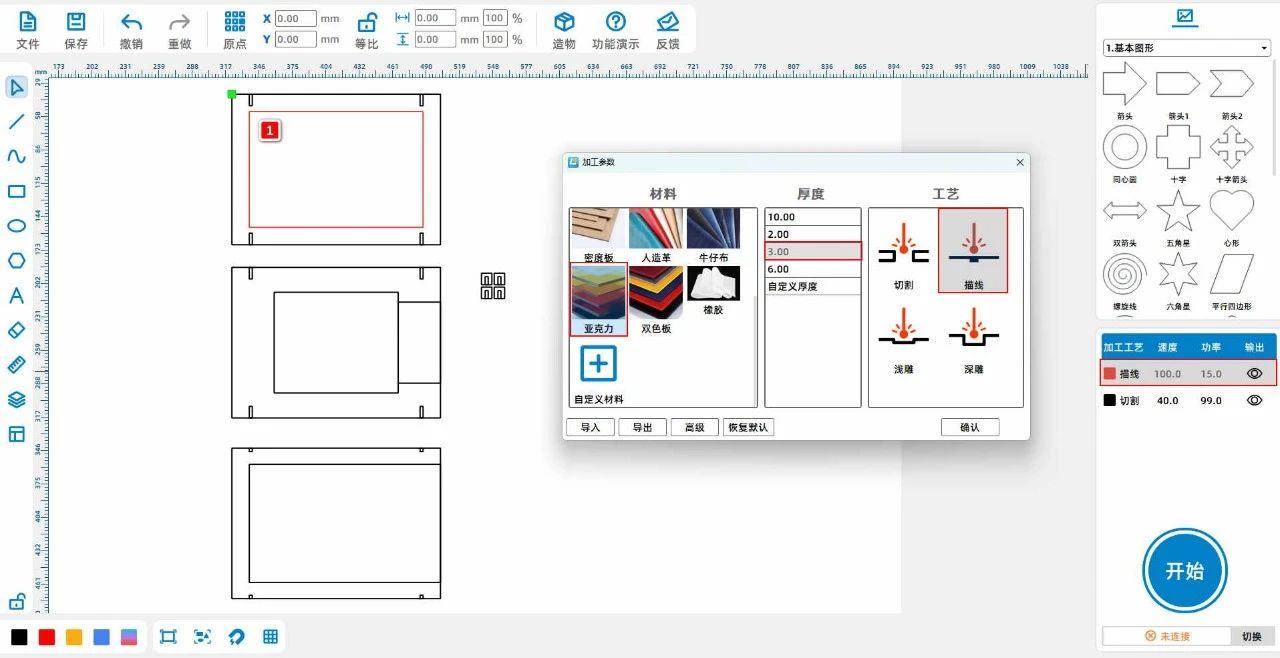
(7)Set the "Right Angle Box" in the "Create" section of the toolbar at the top of the left mouse button to "Long"100, wide80, high40Waiting for parameters "," without top cover ", as shown in the following figure:
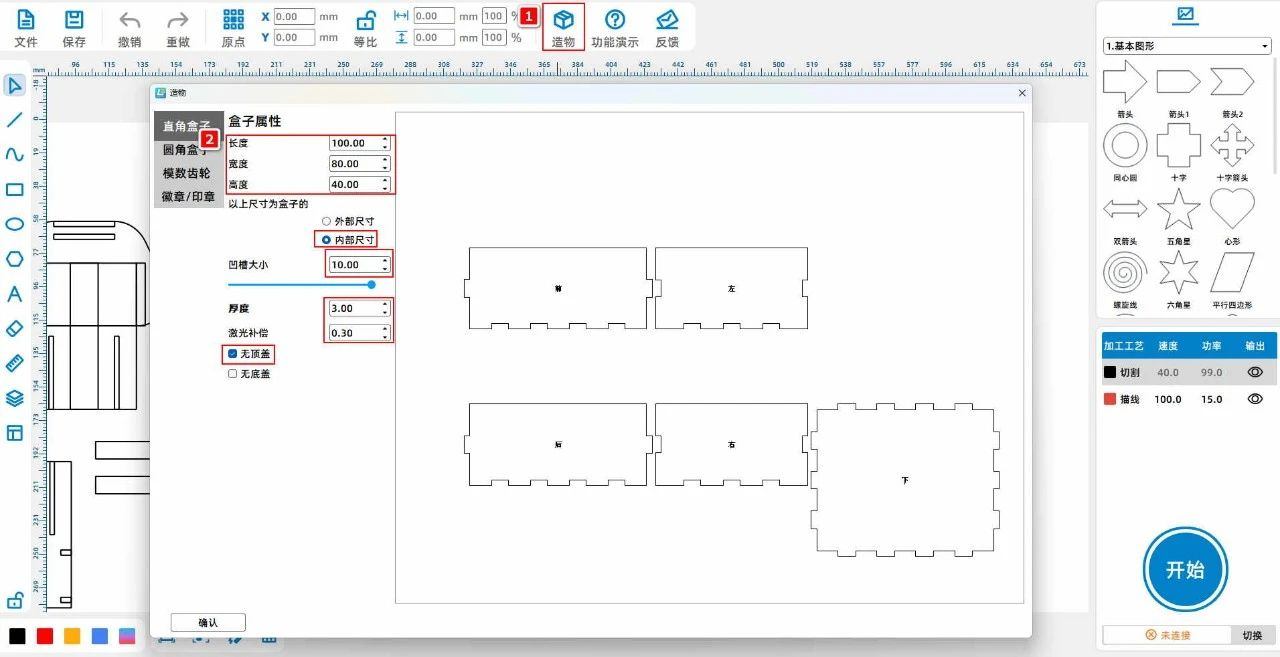
(8)Left click on the left toolbar of the mouse and use the 'Rectangle Tool' to draw three rectangles1For 'wide'69.8, high39.6”, transform the rectangle1Align horizontally and vertically with the lower cover of the right angled box;
rectangle2For 'wide'14.9, Gao Wei9”, rectangle3For 'wide'4, high24”, transform the rectangle3Copy and paste once to obtain a rectangle4, transform the rectangle4Choose“90° "and place the rectangle3、4Horizontal centering "and" vertical centering ", then group them to obtain a group1;
Transform the rectangle2Compared to rectangles1Align, group1Place it in a rectangle2On the left side, along with the rectangle2to be connected;
Group the group1Copy and paste once to get the group2, group2Place it in a rectangle2On the right side, along with the rectangle2to be connected;
Transform the rectangle2Delete, as shown in the following figure:
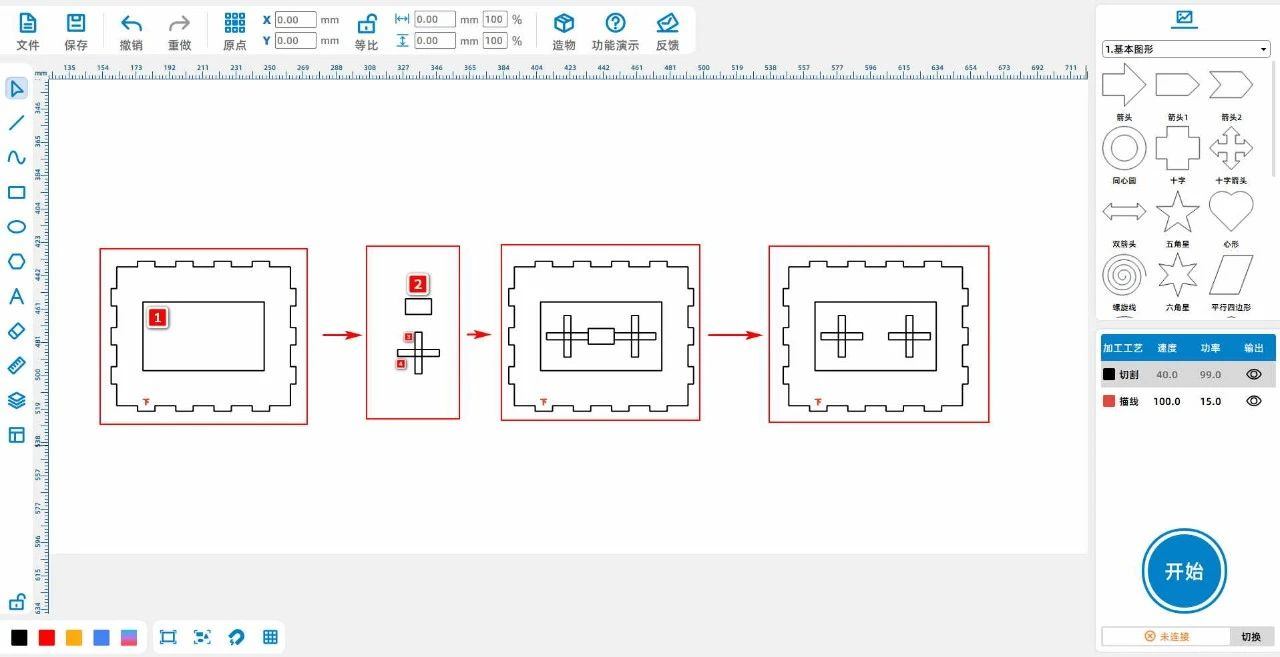
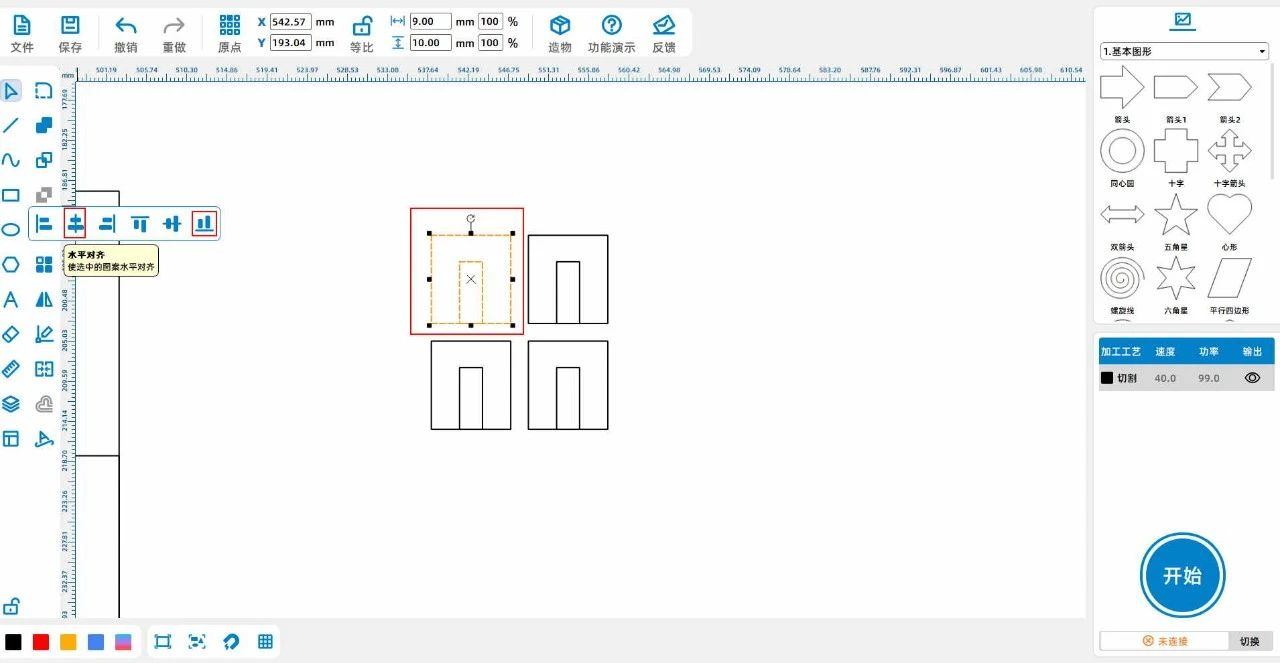
(9)Left click on the left toolbar of the mouse and use the 'Rectangle Tool' to draw three rectangles1For 'wide'2.6, high10”, rectangle2For 'wide'13, high3”, rectangle3For 'wide'10, high2.6”Place it in the following position in the picture;
Transform the rectangle1、2、3Group, get group1, group1Copy and paste once to get the group2And join the group2Horizontal mirroring, group2Place it in the following position in the picture;
Group the group1With groups2Copy and paste together once to get the group3, group3[Vertical Mirror], place it in the following position in the image;
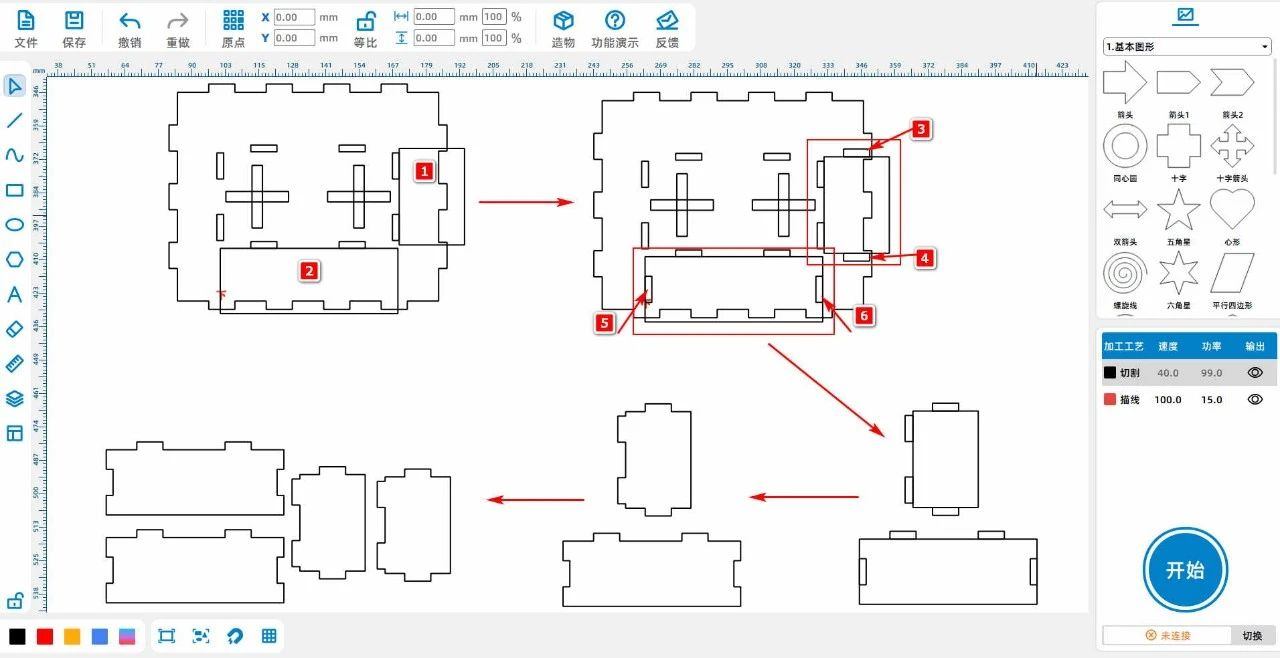
Keep rectangles in each group1、3Delete the other rectangles in the picture along with the two crosses, as shown in the following figure:
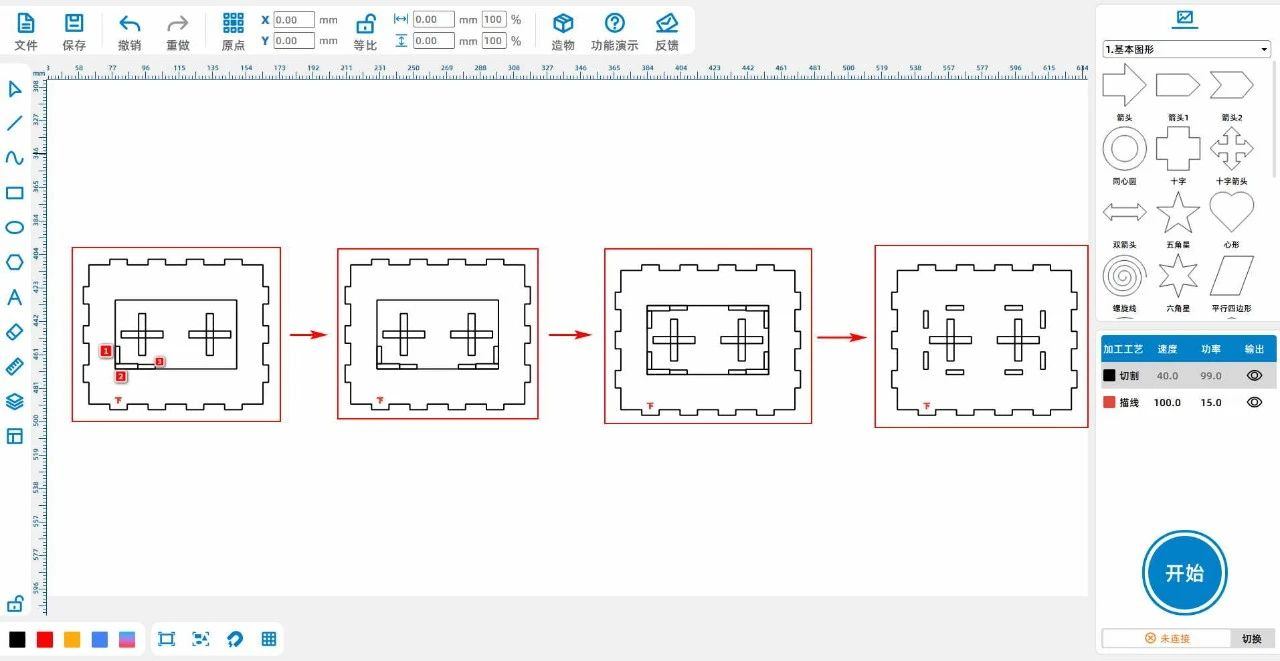
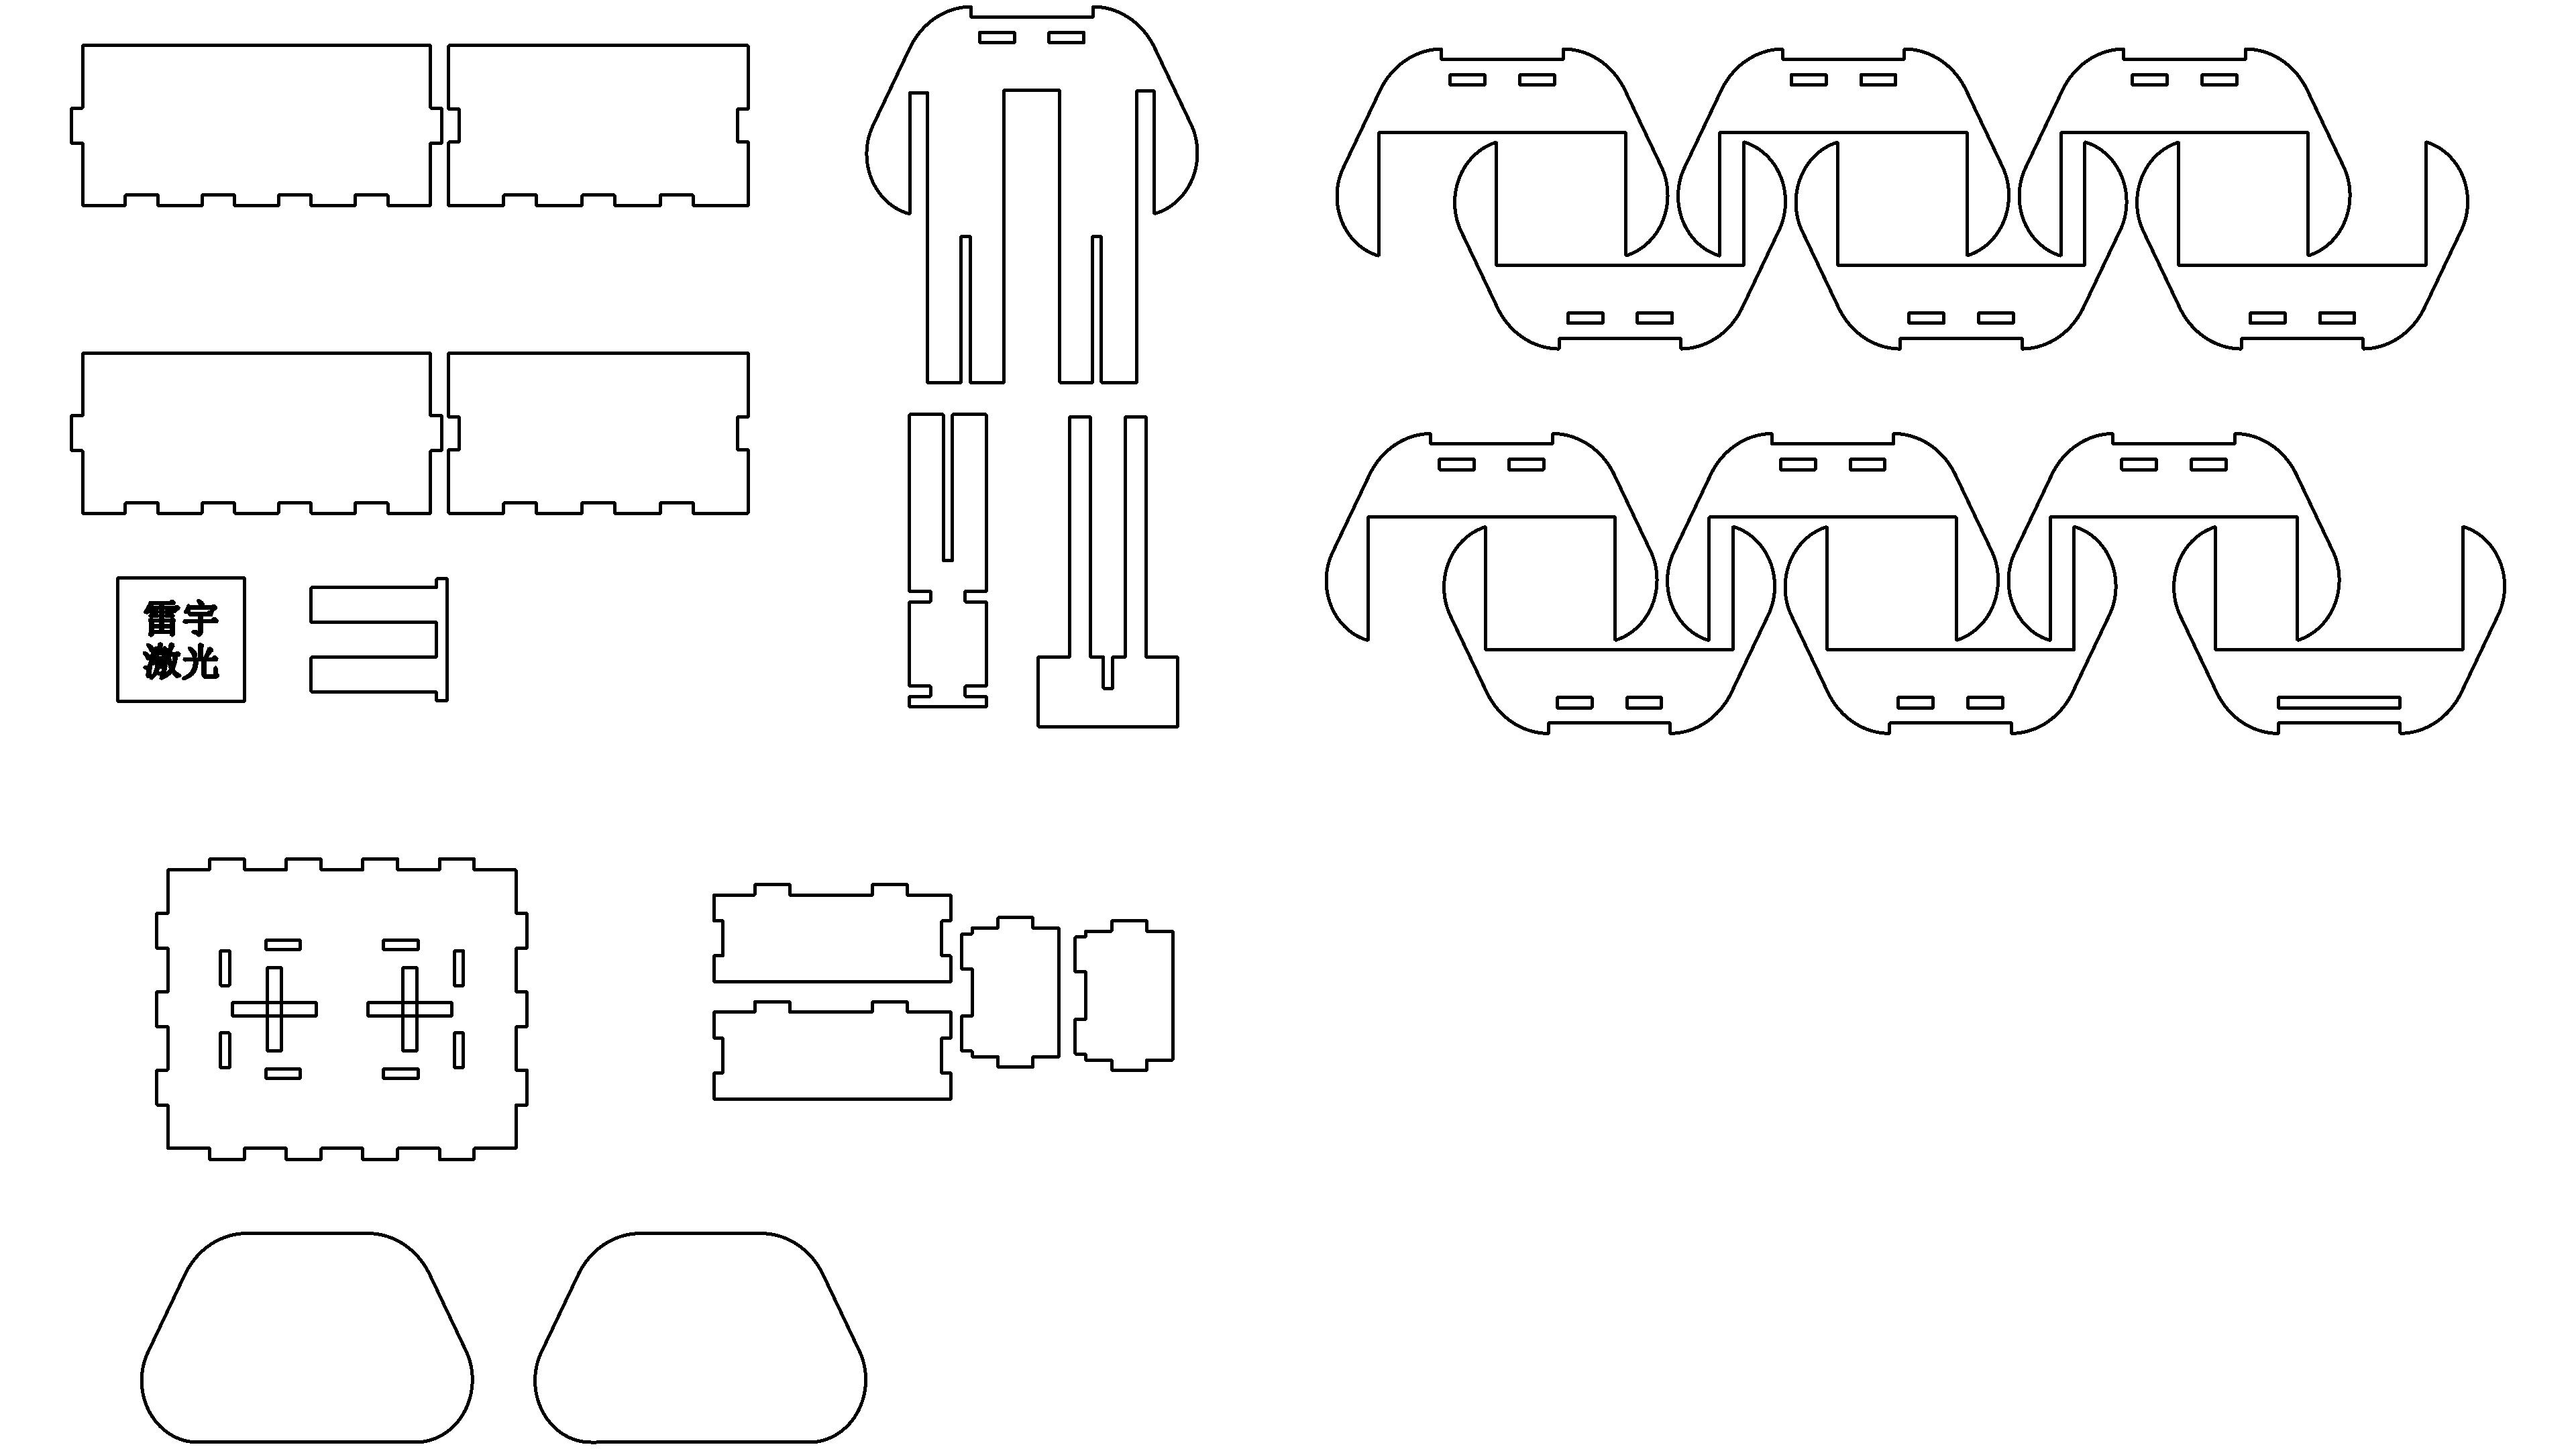
(10)Left click on the left toolbar of the mouse and use the 'Rectangle Tool' to draw three rectangles1For 'wide'25, high37”, rectangle2For“68, high25”;
In a rectangle1Draw a rectangle up and down3、4All are 'wide'10, high3”, in a rectangle2Draw a rectangle up and down5、6;
Select the local area shown in step three, move it outside the lower cover, and modify the rectangle1The width of the two rectangles on the left is3, modify rectangle2The height of the two rectangles above is3;
Merge rectangles1、3、4Compared to rectangles1Two rectangles on the left to obtain the pattern1Merge rectangles2、5、6Compared to rectangles2Two rectangles above, obtain the pattern2;
Separate the patterns 1With patterns2Copy and paste once, as shown in the following figure:
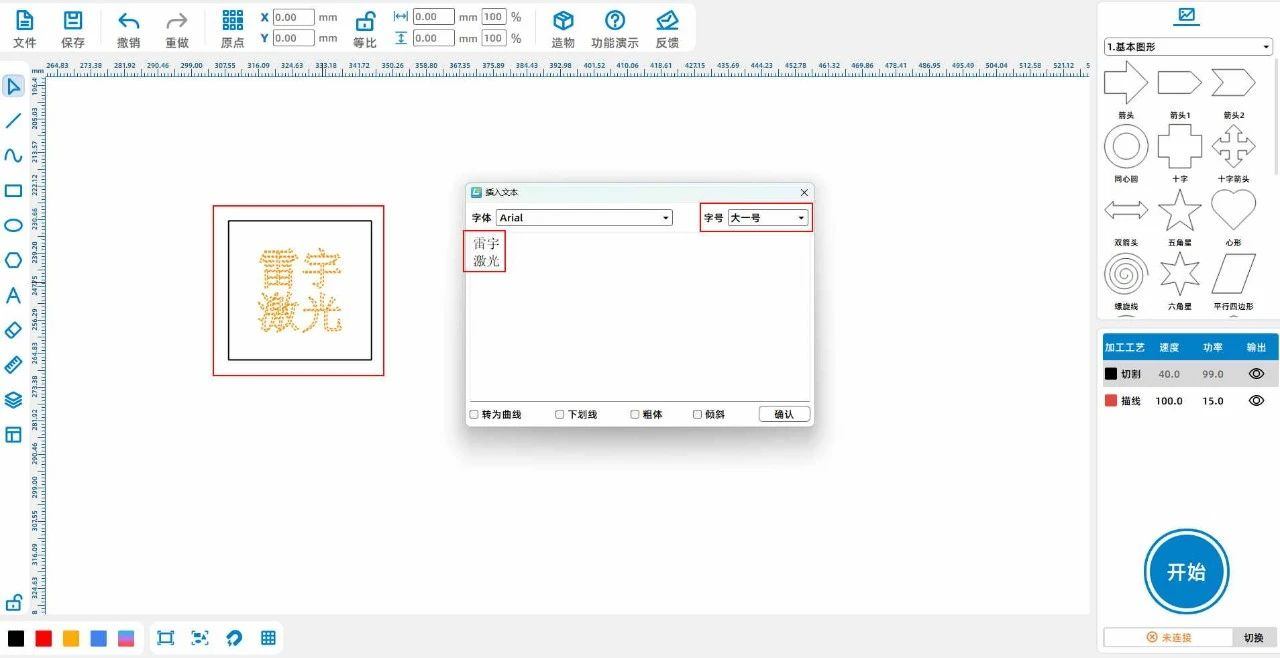
(11)Left click on the 'Rectangle Tool' in the left toolbar of the mouse, draw a rectangle, 'Width'36.4, high35.4”,Select 'Font Tool' from the left toolbar and enter 'Lei Yu'
Laser ", set the font size to" one size larger ", as shown in the following figure:
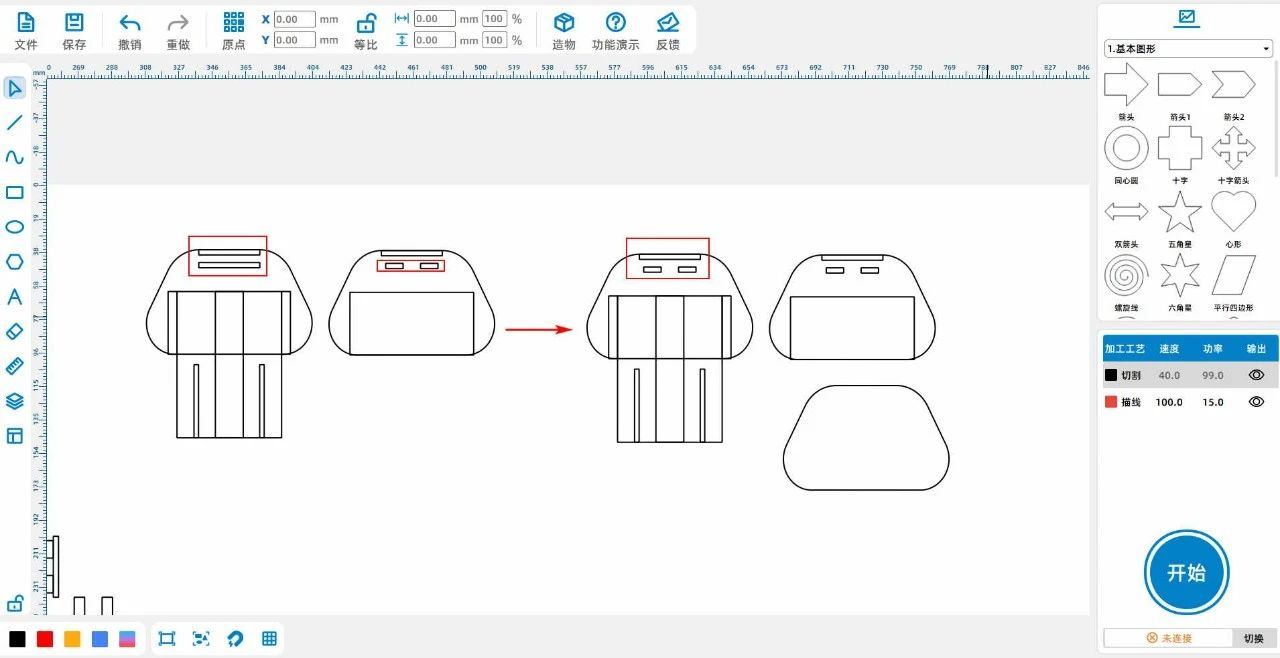
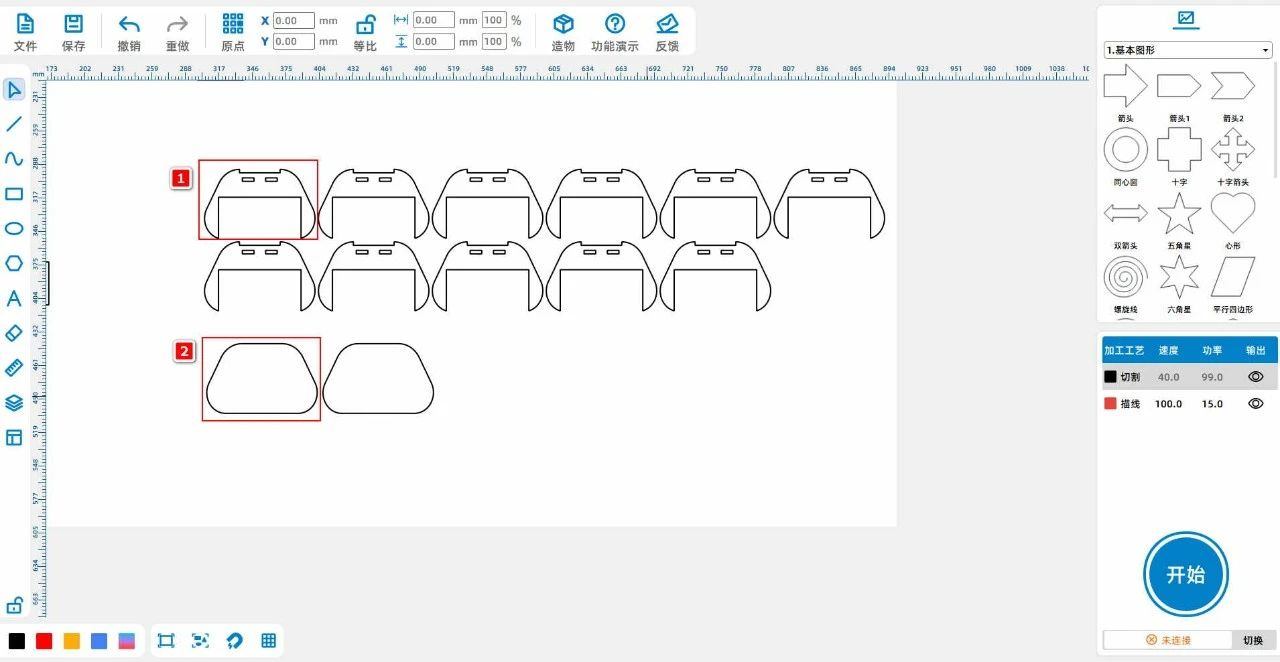
(12)Copy and paste the two rectangles in the red area of the pattern on the right, move them to the second rectangle in the red area on the left, and delete the second rectangle;
Select the outer contour of the pattern on the right, copy and paste it once, as shown in the following figure:
(13)Copy and paste the two rectangles in the red area of the pattern on the right, move them to the second rectangle in the red area on the left, and delete the second rectangle;
Select the outer contour of the pattern on the right, copy and paste it once, as shown in the following figure:
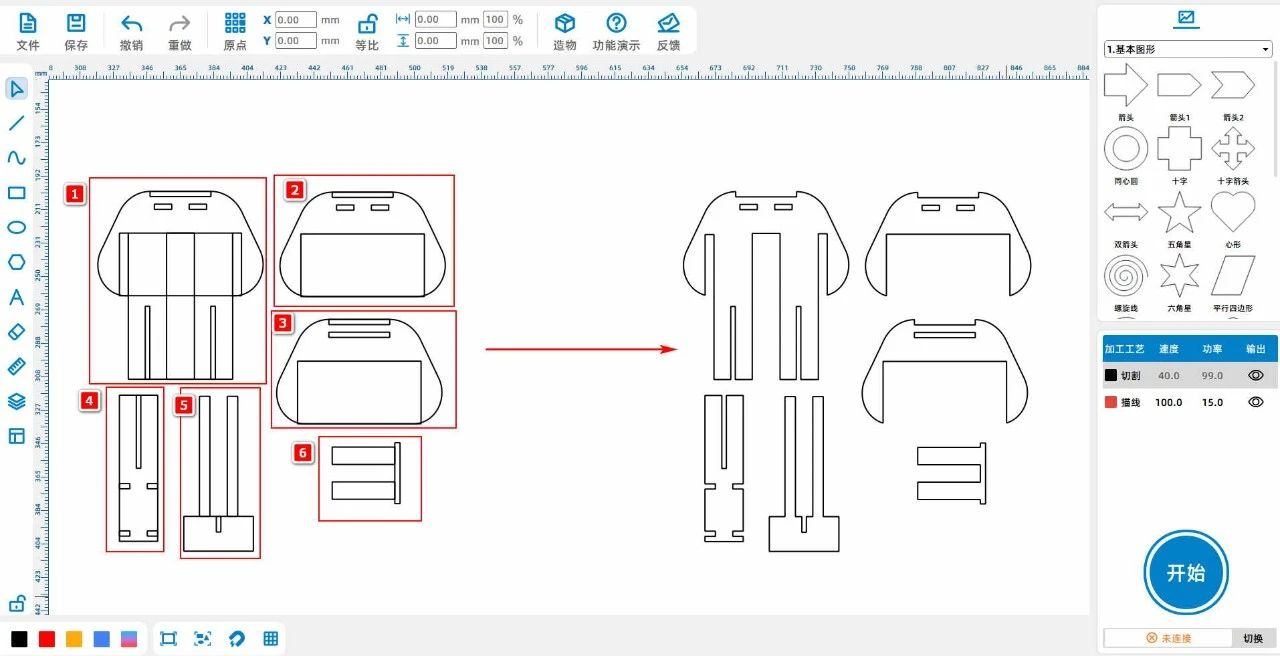
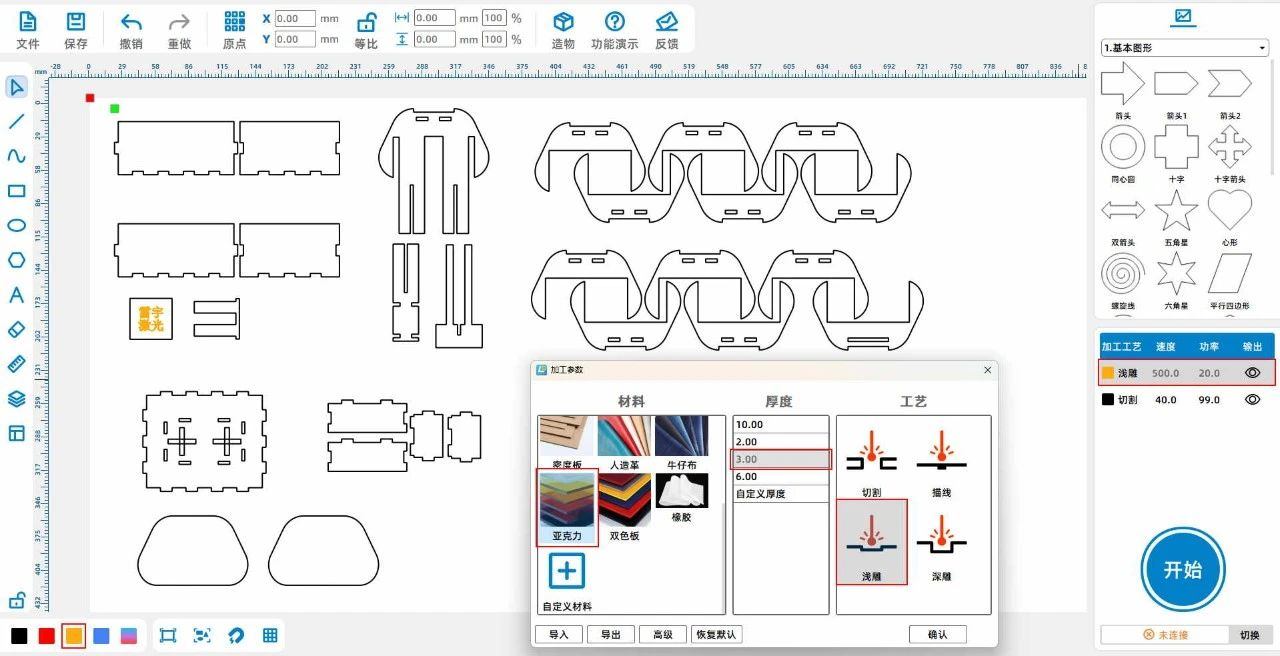
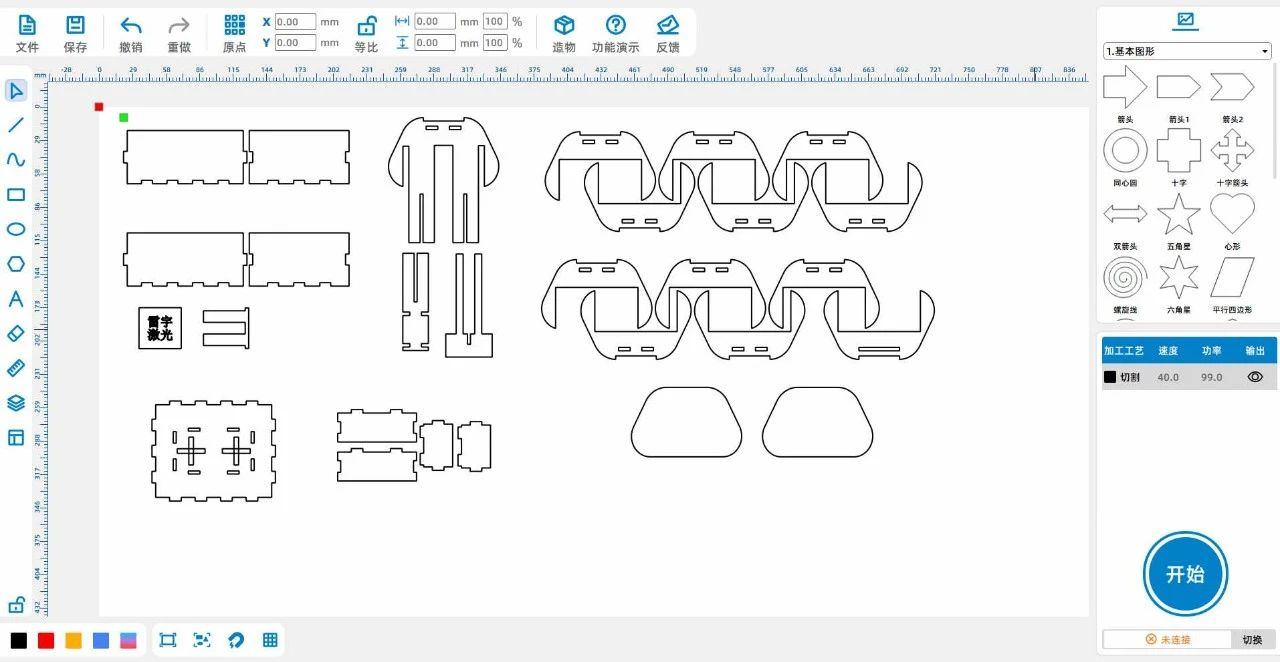
(14)Transform the pattern1Obtained through the array11One, put the pattern on2Obtained through the array2As shown in the following figure:
Through the above steps, obtain the design drawing of the handle:
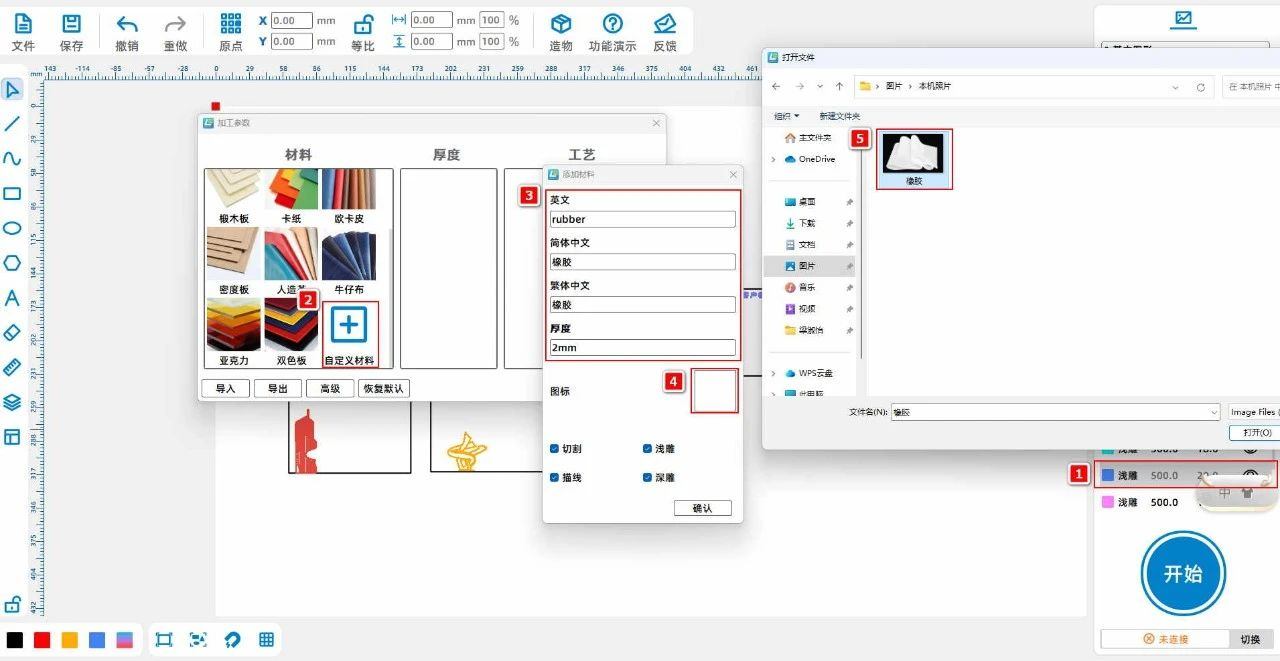
 English
 简体中文
简体中文
 繁體中文
繁體中文
 Français
 Español
 عربي ،
 русский язык
 Português
 Deutsch